Showing posts with label Fujifilm S5700. Show all posts

Friday, 18 September 2015

Seeing things in a different light


A few months ago I chronicled my conversion of an old bridge camera that I had lying around into a infra-red play thing.

Since then it has been a trusty companion over the last few months and I thought it would be a good time to document what I have learned in using it.

The first thing to state, is despite is lowly specifications (7MP)  I can truly say that I have had more fun with with this little hacked cameras than with my more expensive and larger DSLR kit over the summer months.

There are a number of reasons for this,including it's novelty and learning about new photography techniques, but a large part is down to the cameras lightness.

Despite my main camera being a comparativelysmall DSLR. I have come to appreciate a camera that does not weigh you down. In fact, so much so, that I have started to re-think my next camera choices.

I had been tempted bya Sony A-77 Mk II (on the basis that it now seems likely that their will never be another A -Series DSLR). However while now doubts a fine camera, it is comparison with my present kit, a heavy and large beast. So now I ma considering a Sony A-6000 (presuming there is no new consumer E-Format camera in the next few months ). I have even begin to think the unthinkable about other small mirror less cameras such as the  Olympus OM-D E-M10 or the Fujifilm X-T10.

However that is all for the future. What I want to say now is what I found after playing around with IR photography for a few months.

The Best Subjects


Like I said, I have been taking a lot of IR photos over the last few months and I feel I am starting to get an idea about the best ways to take IR photos.

So what have I found in the last few months.

The Good


Trees.

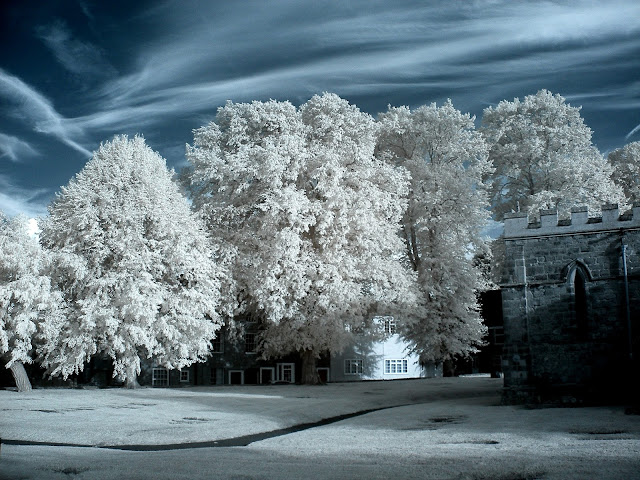
Trees just look fantastic in IR, particularly when in full foliage. In fact I am in danger of starting to build a collection consisting of just standalone trees. Now I cannot resist taking pictures of lone trees against a sky background in IR.

They look especially good with a 850mm filter on. This is because foliage is such a great IR reflector that you get great definition without the green from the leaves overwhelming the picture (eyes are very sensitive to green so can obscure other details)


Clouds

One of the great advantages of IR photography is that IR light is not absorbed by water vapour as much as visible wavelengths are.

This means otherwise hazy skies have much greater contrast and definition in IR light. Take an IR picture on what otherwise appears to be an overcast day, and it results (to my eyes anyway) in pictures of stunning skies, with great cloud definition. I find IR works particularly well when the sky is partially cloudy, but not great on totally overcast days


Landscapes

Since IR photography takes such great pictures of trees and skies, it should be no surprise that landscapes look great too. Because grass is a great IR reflector too, landscapes get an almost fairyland appearance, like they are winter snowy scenes (but without the need to endure sub-zero temperatures to obtain them)


Buildings

Buildings, especially when in full sunlight come out with high contrast, which really suits architectural photography. I'm a great fan of Joel Tjintjelaar  and Julia Anna Gospodarou work in taking high contrast black and white pictures of buildings and cities and I wonder whether there is a role of  IR in this form of photography


Bare Metal

Anything with bare  metal such as old cars, motorbikes and vintage aircraft all look really good in IR. (Trivia point. David Lean's much underrated film the breaking the sound barrier used IR film for many of the flying sequences).

One of my issues with the camera is that it istoo slow to capture such images apart from when they are static.


The bad.


So IR cameras can take some great images, but there are downsides

Low Light

Some think that IR photography allows you to take pictures in the dark. However this sort of camera is just not sensitive enough for that sort of photography.

In fact with the filter basically cutting out over a third of the available light, it is actually far less sensitive than a normal camera before the conversion.

The camera I converted is a product of its age and was not greatly sensitive to begin with. In fact one of the things that has improved greatly with modern cameras is how far you can push their sensitivity before noise starts becoming a problem. However with this camera, anything oner ISO 200 risks too much noise. So generally the camera only works well with a wide aperture in good light

Noise

The corollary of low light performance is image noise. In truth all IR photography will suffer from noise due to the fact we are using just one channel of our sensor(link?). This means the sky especially can show a lot of salt and pepper noise. Now this can be removed with a good photo package, but with the risk of a subsequent loss in sharpness. Saying that, some people actually like the noise and it can add to a picture in some situations.

Photos into the sun.

With IR you have to be very careful in where you are in relation to the sun.

Generally any picture taken up to 45 degrees from the sun will result in flares in the photo. Again these can sometimes add to a picture, but it is a hit and miss affair and generally should be avoided. One thing I need to try,  is to see if fitting a sun hood will help in this.

However generally it is a good idea to try and take the pictures with the sun behind you as much as possible.

Like Icarus, too close to the sun. Not ruined though

The Ugly

People.

Not all subjects come out well in IR photography.

While people give off IR, the camera is just not sensitive enough to distinguish features well. People come out bland, washed out and pretty weird in IR, so IR portraits are probably not a good idea.

However that doesn't mean you should never take photos of people, but you need to be aware of it's limitations (It have some interesting ideas how I can use the effect as we move into Halloween)

Other thoughts


Filters

So far I have bought only two filters to put on the front of the camera, a 720nm and 850nm filter. The difference being is that a 720nm crosses the cusp between visible and IR light, meaning as well as getting more light through, we also get some color.

The 850nm lets virtually no visible light through at all, but you do get a "purer" infra red image.

Of course there is nothing stopping you converting a photo using the 720nm into black and white later, but I must admit I like the 850nm more and have probably spent a lot more time with it.

I have found myself using the 850nm filter far more than the 720nm just because I like the effects.


Processing

The advantage of the 720nm filter is that it can be processed to give blue skies. This a bit of a trick caused by the fact that red in the sky leaks through with this filter on.  To get a blue sky from the red, what is required is to swap the red and blue channels. While the effect can be effective, to me it can appear a little faked. Also it actually results vary widely and I need to experiment to see what are the best ways to achieve this effect.

With a 850nm filter, the image benefits from compressing the limits a little bit. In  fact I find the most effective IR photos are those where the limits can be easily compressed without losing the signal.,

Apart from that, some noise reduction can benefit some photos, especially if the sky is very noisy.


720nm picture before swapping the channels
After processing

Going forward

Like I said, I have had some great fun with the camera despite its lowly specifications. However as with all cameras, the more you use it, the more you are aware of its limitations.

Firstly, although I have not had too many problems with resolution due to the 7MP sensor , a few more MP would be useful, especially if I have to crop the image.

The biggest issue however is pour ISO  noise. Because it is a camera of it's age, I don't really like pushing the ISO too much, because it quickly becomes noisy. This limits to only using the camera in good light and full aperture. It also means that the shutter speed is quite slow.

Therefore I am already thinking about doing a conversion on another Camera. While I would love to see what a Sony A7S II would do as a IR camera, I may have to set my sites a little lower. (I did see someone had done a conversion on a A7R. I have mixed emotions on this. My 1st is jealousy, my 2nd is amazement that anyone has a £1600 'spare' camera)

A tempting target is a Sony NEX-3, which are only about £100 on ebay. One downside is that it does not have a viewfinder, but in every other respect looks perfect.

Until then I still want to try some other things out, such as playing more with the 720nm filter, maybe trying some other filters and seeing what IR cameras do as we move into Autumn and Winter and seeing what happens with flashes.

Playing with IR has been a great experience to me and opened a whole new world of opportunities. You could say that I have seen my photography through a totally new light :)

Useful Links


Friday, 24 July 2015

Hot Photography part deux

I blogged recently about my attempts to create a DIY infra red camera.

I left it at the point where all appeared to be working, but I needed filters in order to complete the task and to reduce the amount of visible light that otherwise overwhelm the IR light we wanted.

One of advantages of the DIY approach is that it allows more flexibility in terms of the type of IR images you want to produce. By varying the filters on the front of the camera, you can let more or less visible light through allowing you to play with the effects. You can have an pure IR image, or by allowing a little colour through, you can get a bit of colour as well as the IR part.

I therefore ordered an 720nm and 850nm screw in filter and when I returned from holiday they were waiting for me.

The 1st thing you notice is that the filters appear black, like a ND filter to the naked eye. Of course this is the point, since they only pass IR, which is not visible to the human eye. Mounted on the camera, it is has little effect on the usable image and little noticeable effect on shutter speed.

The 720nm lets a greater amount of the spectrum through, just poking through into the visible spectrum, while the 850nm has a greater cut-off in the IR region, cutting almost all the visible spectrum out(filters cut-off are not perfect and there will always be some leakage).

Yesterday I had my 1st chance to try them out. IR photography works best with warm blue skies (preferable with a little cloud), and at the moment it is a bit overcast (the irony being that I had just come back from Crete where we had 7 days of rich blue skies which would of been perfect for IR photography), but I couldn't wait to try it, so I went to one of my favorite places, which had a old barn and plenty of foliage.

The 1st issue was the white balance. Since my chosen camera does not support RAW, and normal white balance is skewed by IR, I had to manually adjust the WB. Fortunately the camera does have a custom WB feature, and the advice is to take WB from a large area of grass. So with my 720nm filter on that is what I did.

The results were great.The image turned from uniform red, to the IR silver I wanted. These are the 1st images taken with the 720nm filter on.


I have processed them a bit, by compressing the levels. I also tried switching the red and blue channels. Without much blue sky there is not much contrast, but overall I am happy with the result.


Here is a similar image with the 850nm filter on. You can see the greater IR affect, with the corresponding reduction in visible colour.


Remember both these images are in colour, without any B&W processing


Here are a couple other images.  My only issues was some of the images came out out of focus. However I am not  sure whether this is a result of my modifications, the camera or my usage,


So far I am very happy with the results, and I am looking forward to playing with camera and seeing what it can do.

Sunday, 12 July 2015

Hot photography

I've been fascinated for a long time by infra-red photography. Partly it appeals to my inner geek  due to the science involved, partly because I love the surreal landscape and images that it produces, but most of all because I love hacking stuff to make them do cool things.

In the days of film, you could take infra-red photos by substituting normal film for one that was sensitive in infra-read. The results were very high-key black and white photos. Now that effect can be simulated in Photoshop today, but they are not as effective as doing it in camera.

Digital

Due to the sensitivity of the sensor, digital cameras are excellent at recording infra-red wavelengths

The above image (copyright ) shows the sensitivity of camera sensors compared to the human eye. It is is easy to see that cameras sensitivity extend well into the infra-red. In fact they are so sensitive in this areas, manufacturers go to great efforts to reduce that sensitivity.If they didn't photo's taken on digital cameras would look much redder than images seen by the normal eye.

To stop this camera manufacturers put something called a hot-filter between the lens and the sensor that cuts out a lot of the infra-red wavelengths(In fact despite that many DSLR's cameras are still sensitive to infra-red, but require very long exposures to get anything out of them.) and make the actually sensitive more akin to the human eye.

Therefore to take Infra-red  photos, we need to remove the hot-filter in your camera. However once you have done this the camera will only be suitable for infra-red photos so you don't want to do this on your main camera (it is is strange that no main stream manufacturer allows the in-camera switching of filters[I think Sigma did one once, but it is no longer available], it would be a pretty cool feature).


The camera

So basically you need a second camera. The conversion itself requires taking the camera apart and removal of the the hot filter. There are many firms who will do the conversion for you, however these are quite expensive and I'm cheap so I decided to do it myself.

First I  needed a camera.

As a happy accident I had a spare camera. My late father had bequeathed his collection of cameras , mainly were of film vintage,but he did have a Finepix S5700, which as far as I can tell, had never been used.(my dad was never big with computers, which made owning a digital camera relatively useless exercise)


Now this camera is not exactly a Nikon D800, being of a certain vintage and limited to only 7 MPixels (which is less than you would get in a high end mobile phone today), but it was a decent bridge camera in it's day and has some significant advantages.

Firstly it allows you to set a custom white balance. Infra-red skews the standard white-balance, and unless you have a camera that does raw you need to modify the white-balance before shooting.

Secondly It will take screw in filters. More on that later.

Thirdly, being mirror-less you get continual live view. You can do Infra-Red with DSLR's, but you can only see the actual result in live view, which means using the back-screen and not the viewfinder. This camera has a EVF viewfinder which makes it more convenient.

Also focusing is based on the on-sensor chip. A lot of DSLR's struggle to focus in infra-red because they rely on the phase detection chip in the viewfinder, which calculates the light path differently for visible and infra-red light.

Best of all someone had already done the conversion and posted  instructions on the internet.

One thing I did need however to complete the conversion,  was a replacement filter.

Now it is not clear why this is required. It seems that for some cameras, once the hot-filter is removed, they do not focus well unless a equivalent piece of non-filter glass is used to replace it. So I needed to make myself a filter made of plain glass of the same dimensions as the hot filter.

This sounds simple, but glass is not an easy material to work with and the size of the sensor means it was always going to be fiddly.

What I needed was some glass (microscope slides work perfectly here), some method of shaping the glass to the right dimensions and a way of measuring it, I duly purchased  a glass cutter and glass files, a digital micrometer and 50 microscope slides (that was the smallest quantity I could get, but hey, at least I had plenty of raw material. )

Ready for conversion

Duly armed I set about with my task. However I quickly hit an issue. In my haste to do the job I had not actually tested the camera. I had assumed since it was basically unused, it would work.

No such luck. When I put the batteries in, it was as dead as the proverbial dodo. So I was forced to buy a second camera of flea-bay. Not a good start.

Now I had a spare, but non-functioning camera. So I decided to do a trial run on that one.

The dis-assembly  

It's amazing how often you read instructions on the internet and it seems so simple. Normally it is fine until the point of no-return and then goes pear shaped.

I generally have no problems taking things apart. Putting things back together in something akin to the original state I find is the challenge and so it proved in this case.

Taking the camera apart proved quite simple, but I just could not get the thing together. The main issue was the ribbon cables that linked the boards together. They were small, fiddly and just would not re-connect. It took me 3 days until finally I managed to re-assemble the camera (losing only 1 screw in the process).

This was the problem one (copyright  akry.livejournal.com)


However all in all it proved a useful exercise. One other thing I learned was the dimensions of the hot filter given in the original instructions was in fact in-correct meaning I needed to create a new one of the correct size.

The old filter (copyright  akry.livejournal.com)


However it was here that something strange happened.

I decided for no good reason , to test the camera again and to my surprise it turned on. OK, it would not focus, but it showed that perhaps the original issue was to do with the connectors and maybe I could fix it.

So I decided to take the camera apart again, partly for practice and partly to see if I could fix the focusing issues. The 2nd time was a lot easier and to my surprise everything worked....

So if I learnt anything, it is assembling and dis-assembling cameras is not easy  and be prepared to get it wrong.

(see here for a better example of the pitfalls  ),

First Light

So how do you test your camera is picking up infra-red?

Well, just pointing out of the windows may not show much, especially if the camera is getting all the other visible wave lengths as well. The best way is to take a TV remote and point it at the camera while pressing a button. Normally the camera will not see the light, but now you should see the LED flash, like below

Phew, it works
These are the images taken outside, with no changes to the white balance. As you can see they are now a lot redder, due to the extra light from the red side of the spectrum getting through


What Now?


So far so good. But we are a little way to getting those infra-red only shots. The problem is that now the camera is actually getting too much light from the visible end of the spectrum. We are only interested in the infra-red stuff.

What we need is to put a filter on to take the visible stuff away. This was point about why this camera is a good fit for this type of conversion,  since it will allow you to mount a 46mm filter on the front.

I believe if you send your camera off to be converted, they will often replace the hot filter with a standard IR filter. However there are many variations of IR filters, each with advantages and disadvantages.  For example the more light you block off, the longer the exposures will be. By allowing the changing IR filters we have more flexibility on when and where we take our photos.

Generally IR starts at about 700nm. So a 700nm filter will pass all light at a larger wavelength. However filters are not perfect and will pass other colours as well. A 950nm filter will pass far less of the visible light and have a pure IR affect

Anyway I am going to get a 720nm and a 850nm filter to start and see how I get on. Certainly I expect exciting times ahead.

Postscript


Someone has corrected me that it is still possible to purchase a Sigma SD1, and a very interesting (but probably technology dead-end it is). However it could never be called a mainstream camera