Showing posts with label High Speed. Show all posts

Wednesday, 19 August 2015

Smash and Grab

 This is an update on the fun I have smashing glass. I blogged here about my attempts to photograph light bulbs being destroyed.

Since then I have refined my techniques a little.

The diagram below is the basic setup


 Basically it is a swinging arm, with a hammer attached, directed towards a unsuspecting light bulb. The camera is opened before the swing and at the opportune moment the flash fires taking the image.

When we left it last time I was having problems attaching the hammer, keeping the bulb still on impact and getting only one flash.

These problems have largely been solved. The hammer is now attached using a couple of metal strips with bolts through them. I added extra bracing behind the bulb to stop it going back on impact.

The multiple flash took a bit of working out. The problem was the hinge which formed 1 part of the switch did not move out the way enough when hit by the bolt, This caused the bolt to scrape against the hinge edge, so causing the multiple flash. This was solved by making the bolt hit the center of the hinge, and putting insulating tape on the edge.

I also put black cloth at the end of the garage so we have a cleaner backdrop.

The original intention was to fine tune the contact point by moving the bolt in and out. However it worked out easier to move the work bench.

Below is the setup in all it's glory. Note the pristine work conditions.

The way it works is that I hold the pendulum to one side, activate the camera in bulb mode using a remote trigger. Let go of the arm and hopefully once the flash has gone, let go of the camera remote. It is then a process of picking through the broken glass in order to setup the next shot.

Here is a closeup of the trigger. I was tempted to build a electronic delay  trigger and certainly a sound triggered system may of been easier, but the low tech approach worked too.


So what are the results? Certainly getting there. One thing I learned was the duration of the flash is based on the power. The lower the power the shorter the flash. So I have moved the flash closer and set the camera ISO higher

As I mentioned before, my original intention was to break bottles, but they proved rather resilient for that. Because of size constraints I am limited to the maximum swing of the pendulum. Still now I have perfected the technique I may give it another  go at some time.

Sunday, 21 June 2015

Breaking Bad

To learn anything requires you to repeat an exercise in the same conditions and measure your improvements.

In outside photography this can be a problem, because there are so many variables such as the light, the subject, and the position of the camera. even the lens used and the camera settings.

While often you can extrapolate from one photo to another, it is sometimes nice to be in more controlled conditions.

One way this can be done is via indoor photography. Here you can play around to your hearts content, with all sort of parameters while at the same time taking photos of the same subject.

Of course to do this it is great to have a room set apart for your studio. Unfortunately if you have a growing family, you are unlikely to be in that sort of situation, so instead have to work round the ordinary detritus of human life.

In my case this is the garage. Now like most garages, it has been many years since a car was ever parked in it, and we would struggle to even get a bike in nowadays. Needless to say then it is not ideal as studio,since we  have to fight around tools, drink and various large quantities of wood I have collected  over the ages "just in case" I ever decide to start a carpentry business.

However it has a number of qualities which any studio should have. It is out of everyone's way,. meaning I will not be disturbed. Outside light can be shut off if needed, and with a little re-arranging enough space can be had to set up tripods etc.

The project


 I have always wanted to try my hand at high speed photography, and I had a project in mind to achieve this, and this is where the garage came into play.

The project was to record  the breaking of glass.

Now there appears to be two ways to do high speed photography. Either open the shutter at a high shutter speed in strong light at the opportune moment, or leave the shutter open in the dark and fire a flash at the optimum moment(or a combination of both).

Now both of these require am accurate method of triggering at the opportune time, but the former method is likely to be the hardest, since there would always be a lag between shutter press and activation. So I therefore decided to do the latter.

For this I purchased a radio trigger for my flash. This meant that I could position the flash away from the camera with the trigger close to the subject I wanted to take. Also the trigger had a 3.5 mm din socket that would allow me to trigger the flash by connecting two wires together at the correct moment.

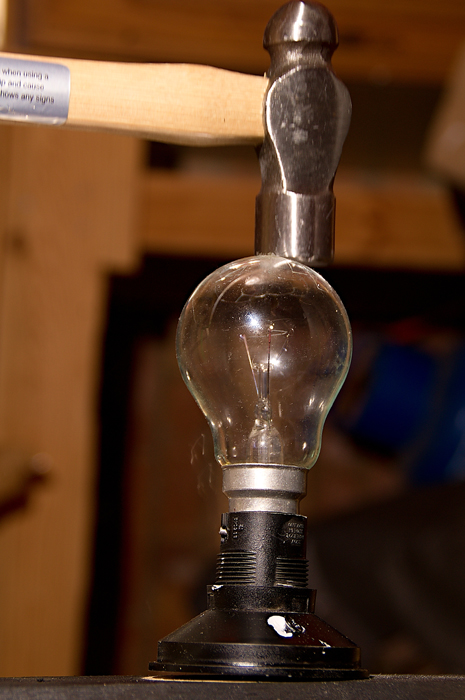
Although  this sounds complex, the real difficulty was triggering the flash at the right moment. The idea was to swing a hammer on a pendulum and at the bottom of the arc meet a glass object. At this point I wanted to trigger the flash.

Now there are a number of ways I could do this. A electronic method could be rigged that triggered the flash if a light beam was broken, or on a sound. However to keep it simple I put a bolt on the pendulum that at some point on the arc would hit a hinge, so make electrical contact and fire the flash. The bolt was used so I could adjust it. The hinge's purpose was so that in theory it would only fire once, since the hinge would fold out of the way.

So how did it go? Well initially I was going to try it with bottles, but I found out that bottles are   actually very hard to break, so I substituted them old type light bulbs which proved far more fragile

This is one of my 1st goes.


As you can see, it worked but the flash fired too early, so although the bulb is breaking it is not quite enough to be easily visible.

However this one was far more successful.


Still I think I can do better. For example the bulb holder has mover as the hammer hit, and it is just a few moments too late.  However I have already learnt some important lessons.

1. I thought I would need to do this in total darkness, which made me nervous of swing a hammer on a pendulum in pitch black with me and camera equipment around. However it turns out that if I set a low ISO, dim lighting is adequate.
2. Triggering is harder that I thought. The mechanism at present sit fires multiple times, which means I have to manually close the shutter, before the 2nd flash. Also adjustment is not as easier than I thought, so i will probably need to redesign the  trigger.
3. Glass gets everywhere, so put sheeting under the work bench and have a way of removing the light bulbs from there holder such as pliers.
4. Get a bigger hammer!. Actually securely attaching the hammer to the pendulum is one of the challenges I need to master. At present I user tie wraps, but they tend to come loose.
5. I will need a lot of bulbs.

Still it is promising. I am tempted to make a electric flash delay that would give be more control on when the flash goes off, but we will see. What I do know is that I will need a lot more light bulbs...


Monday, 23 June 2014

Summer Time Balloons

You would of thought that summer is a great time for photography, but it's not necessarily so. Generally the best time of the day for outdoor photographs is a period termed the golden hour. This is normally an hour after the sun has come up or an hour before the sun goes down. At this time the shadows of the setting sun bring out the structure of the landscape, highlighting scale and distance. Also the young suns rays turn the world to a rich orange.

Unfortunately in the UK at high summer, this means either getting up very early or staying up very late. When the sun is high in the sky (yes we do get sun in the UK) it dramatically shortens the shadows and generates a huge amount of glare making photos look washed out. But beggars can't be choosers and it feels wrong to waste all that light without getting the camera out on such a day. 

The question is then what to take? 

Things low to the ground like flowers are good. Also portraits where you can use the sum to get a nice halo effect through the hair are excellent. But they are a bit done that, bought the t-shirt.

This weekend I was watching my daughter and her friends take advantage of the hot conditions to break into water fights and it gave me an idea. One of the things they had started doing was throwing water balloons at each other. This gave an opportunity too good to miss to try my hand at  high speed photography. 

Basically the challenge was to photo a water balloon at the moment of bursting

Now the normal way to do this sort of photography is to go in a dark room, open the camera shutter up and set off a short flash burst, when the event you want to photograph occurs. However apart from the mess it would make of the carpet, I wanted to provide some context by including my 10 year daughter in the photo.

One of the modes that my Sony camera comes with is one for high frame photography called continuous priority AE mode. This can take frames up to 7 frames per second (with some caveats such as the pictures are JPEG's not in RAW). I had never used this mode in any of my photography. One of the problems is that the manual that came with the camera is in fact pants. It describes the functions in purely technical terms leaving you to work out the rest. Until I had bought David Bush's SLT-A37  excellent book I hadn't realised how little I knew about all camera modes. 

Some of the modes seem to in fact have very little function and you wonder why they are wasting space on the dial. The Sony camera includes a 3D mode which in theory takes photos that gives a 3D effect when used with special goggles. I can only assume this was through special request of the Sony marketing men, who read that 3D was going to be the technology wave of the future, in the same way as people bought TV's capable of 3D then after 2 hours of sitting around wearing silly goggles never used them again.

Anyway I decided to give it a go and first co-opted my daughter as a willing volunteer. We got one of her friends to position the balloon next to her head and I set up the camera up on a tripod. I counted down to 1 and pressed the shutter. Unfortunately at this point we found out that bursting balloons, even armed with a pin, was actually quite hard. so my wife had to take over as the tormentor in chief 

After a few attempts we finally managed to get the balloon to burst on cue and got a couple of decent shots in the process

The results I think are pretty good. Even with a good frame rate, timing is crucial and I was lucky to get 2 decent shots. Of course to a 10 year old, getting wet without returning the favor to someone else quickly gets boring, so I only managed a couple attempts. Maybe next time I will have to resort bribery (or restraints). I also had to use Photoshop a bit to reduce the brightness of the water and increase it's transparency.

Two things I would of changed however. I had been shooting indoors previously and had forgot I had the camera at quite a high ISO(3200) setting on. Because I was using quite a fast shutter speed this may of not made much of a difference, but I would of liked to try again at a lower ISO. 

Also with hindsight a picture with the balloon above her head would of been even more dramatic. All I need to do now is to persuade my willing victim to partake again. One thing is for sure. Once a balloon full of cold water drops on her head, I'm pretty sure I won't get a 2nd attempt.