Sunday, 12 July 2015

Hot photography

I've been fascinated for a long time by infra-red photography. Partly it appeals to my inner geek  due to the science involved, partly because I love the surreal landscape and images that it produces, but most of all because I love hacking stuff to make them do cool things.

In the days of film, you could take infra-red photos by substituting normal film for one that was sensitive in infra-read. The results were very high-key black and white photos. Now that effect can be simulated in Photoshop today, but they are not as effective as doing it in camera.

Digital

Due to the sensitivity of the sensor, digital cameras are excellent at recording infra-red wavelengths

The above image (copyright ) shows the sensitivity of camera sensors compared to the human eye. It is is easy to see that cameras sensitivity extend well into the infra-red. In fact they are so sensitive in this areas, manufacturers go to great efforts to reduce that sensitivity.If they didn't photo's taken on digital cameras would look much redder than images seen by the normal eye.

To stop this camera manufacturers put something called a hot-filter between the lens and the sensor that cuts out a lot of the infra-red wavelengths(In fact despite that many DSLR's cameras are still sensitive to infra-red, but require very long exposures to get anything out of them.) and make the actually sensitive more akin to the human eye.

Therefore to take Infra-red  photos, we need to remove the hot-filter in your camera. However once you have done this the camera will only be suitable for infra-red photos so you don't want to do this on your main camera (it is is strange that no main stream manufacturer allows the in-camera switching of filters[I think Sigma did one once, but it is no longer available], it would be a pretty cool feature).


The camera

So basically you need a second camera. The conversion itself requires taking the camera apart and removal of the the hot filter. There are many firms who will do the conversion for you, however these are quite expensive and I'm cheap so I decided to do it myself.

First I  needed a camera.

As a happy accident I had a spare camera. My late father had bequeathed his collection of cameras , mainly were of film vintage,but he did have a Finepix S5700, which as far as I can tell, had never been used.(my dad was never big with computers, which made owning a digital camera relatively useless exercise)


Now this camera is not exactly a Nikon D800, being of a certain vintage and limited to only 7 MPixels (which is less than you would get in a high end mobile phone today), but it was a decent bridge camera in it's day and has some significant advantages.

Firstly it allows you to set a custom white balance. Infra-red skews the standard white-balance, and unless you have a camera that does raw you need to modify the white-balance before shooting.

Secondly It will take screw in filters. More on that later.

Thirdly, being mirror-less you get continual live view. You can do Infra-Red with DSLR's, but you can only see the actual result in live view, which means using the back-screen and not the viewfinder. This camera has a EVF viewfinder which makes it more convenient.

Also focusing is based on the on-sensor chip. A lot of DSLR's struggle to focus in infra-red because they rely on the phase detection chip in the viewfinder, which calculates the light path differently for visible and infra-red light.

Best of all someone had already done the conversion and posted  instructions on the internet.

One thing I did need however to complete the conversion,  was a replacement filter.

Now it is not clear why this is required. It seems that for some cameras, once the hot-filter is removed, they do not focus well unless a equivalent piece of non-filter glass is used to replace it. So I needed to make myself a filter made of plain glass of the same dimensions as the hot filter.

This sounds simple, but glass is not an easy material to work with and the size of the sensor means it was always going to be fiddly.

What I needed was some glass (microscope slides work perfectly here), some method of shaping the glass to the right dimensions and a way of measuring it, I duly purchased  a glass cutter and glass files, a digital micrometer and 50 microscope slides (that was the smallest quantity I could get, but hey, at least I had plenty of raw material. )

Ready for conversion

Duly armed I set about with my task. However I quickly hit an issue. In my haste to do the job I had not actually tested the camera. I had assumed since it was basically unused, it would work.

No such luck. When I put the batteries in, it was as dead as the proverbial dodo. So I was forced to buy a second camera of flea-bay. Not a good start.

Now I had a spare, but non-functioning camera. So I decided to do a trial run on that one.

The dis-assembly  

It's amazing how often you read instructions on the internet and it seems so simple. Normally it is fine until the point of no-return and then goes pear shaped.

I generally have no problems taking things apart. Putting things back together in something akin to the original state I find is the challenge and so it proved in this case.

Taking the camera apart proved quite simple, but I just could not get the thing together. The main issue was the ribbon cables that linked the boards together. They were small, fiddly and just would not re-connect. It took me 3 days until finally I managed to re-assemble the camera (losing only 1 screw in the process).

This was the problem one (copyright  akry.livejournal.com)


However all in all it proved a useful exercise. One other thing I learned was the dimensions of the hot filter given in the original instructions was in fact in-correct meaning I needed to create a new one of the correct size.

The old filter (copyright  akry.livejournal.com)


However it was here that something strange happened.

I decided for no good reason , to test the camera again and to my surprise it turned on. OK, it would not focus, but it showed that perhaps the original issue was to do with the connectors and maybe I could fix it.

So I decided to take the camera apart again, partly for practice and partly to see if I could fix the focusing issues. The 2nd time was a lot easier and to my surprise everything worked....

So if I learnt anything, it is assembling and dis-assembling cameras is not easy  and be prepared to get it wrong.

(see here for a better example of the pitfalls  ),

First Light

So how do you test your camera is picking up infra-red?

Well, just pointing out of the windows may not show much, especially if the camera is getting all the other visible wave lengths as well. The best way is to take a TV remote and point it at the camera while pressing a button. Normally the camera will not see the light, but now you should see the LED flash, like below

Phew, it works
These are the images taken outside, with no changes to the white balance. As you can see they are now a lot redder, due to the extra light from the red side of the spectrum getting through


What Now?


So far so good. But we are a little way to getting those infra-red only shots. The problem is that now the camera is actually getting too much light from the visible end of the spectrum. We are only interested in the infra-red stuff.

What we need is to put a filter on to take the visible stuff away. This was point about why this camera is a good fit for this type of conversion,  since it will allow you to mount a 46mm filter on the front.

I believe if you send your camera off to be converted, they will often replace the hot filter with a standard IR filter. However there are many variations of IR filters, each with advantages and disadvantages.  For example the more light you block off, the longer the exposures will be. By allowing the changing IR filters we have more flexibility on when and where we take our photos.

Generally IR starts at about 700nm. So a 700nm filter will pass all light at a larger wavelength. However filters are not perfect and will pass other colours as well. A 950nm filter will pass far less of the visible light and have a pure IR affect

Anyway I am going to get a 720nm and a 850nm filter to start and see how I get on. Certainly I expect exciting times ahead.

Postscript


Someone has corrected me that it is still possible to purchase a Sigma SD1, and a very interesting (but probably technology dead-end it is). However it could never be called a mainstream camera


Saturday, 11 July 2015

Wyatt Neumann

Sometimes you see someone's work and something just clicks. It makes you stop, look harder and something in your soul say 'yeah!'

That happened to me when I first saw the photography of Wyatt Neumann.

Art often affects us because of a common bond; some common life experience which allows you to see what the other person is trying to express through your eyes and strums a chord.

But in Wyatt's case,it is hard to see any common frame of reference between him and me.

From the outside, he appeared very much the American free spirit, brought up on a hippy compound, a man who spent it seemed a large part of his life riding his motor cycle around the USA, taking any image that took his fancy. I on the other hand are the typical English middle class child, who rules are there to be obeyed and where travel is an unfortunate curse to be avoided at all costs. I doubt if we had ever met in person we would of had much to talk about.

But there was one common element and that was the dad's love of his daughters.

I first came across Wyatt's work when I was writing this blog entry At the time I was annoyed that society was  putting barriers in me recording my children's life. Wyatt had had similar issues, when he presented photos of his daughters that some labelled as obscene, rather than what they were,  the  recording of a child's innocence through the eyes of a father.

In an era where even a suggestion of impropriety to children can create something akin to mob rule these are dangerous territories and it would of been easy for him to turn away, but instead he did what many great artists do, and turned the issue on its head and used the controversy to examine how we deal and treat children in photography.

After that I kept an eye on his work, watching his twitter feed as he sent in photos from his travels (or notes from the road as he called them) and of his two muses, his daughters. As he did I came to admire his ability to present a story from, for me, an often alien landscape. I also loved the way he could get the expression and joy of how children are in your life.

You might have noticed that I have been typing this calling Wyatt in the past tense. That is because I was shocked to learn that Wyatt died recently after a brain aneurysm caused a motorcycle crash. You might say that he died as he lived, on the road, but I  doubt that is much consolation to his wife and daughter. Also in some way, his photos of his daughters gave me an insight into his life, which makes his passing feel so much more personal.

It is very hard to say something consoling after a loss that does not sound trite or vacuous. This is doubly so when talking about a person who you only know through photos or tweets. Also I know it is highly unlikely that anyone of Wyatt's relatives and friends will ever read this obscure blog, but if they do, I would like for them to know how much his work affected me, despite our distance both  geographically and culturally, both as a photographer and a father, and in that small way he will live on.

R,I,P Wyatt Neumann Photographer and Father.

There is a fund for raising money for his Wife and daughters here


Thursday, 25 June 2015

Stop this stupid European photography law...

I don't normally get political but I do get a be in my bonnet about copyrights and the there is new European legislation in the offing that would make the taking and selling of photos with buildings in virtually impossible.

There is a online petition here,

so if you live in Europe and like your photography please sign.

Thanks


Wisdom of the crowd

One of the hardest things to do as a photography starting out is judging the quality of your own photos.

There are a number of ways to gather opinion, However they all suffer from the same issue that while people are quite happy to praise a photo, they are far less likely to give you negative criticism. Even if they do, they will rarely give you any useful ways to improve it.

I have always been a fan of 500px since it is one of the few ways to rate my pictures. However it suffers from the same problem. While you can judge by the number of positive likes and loves how favorable received your image is, it will not tell you the opposite i.e how disliked it is.

Up to recently I have been quite good at picking out images for 500px and got some good scores. This recently however came to a shuddering halt when I put this image on.

Now I like this picture. It has an unusual angle, tells a good story, and rather than being a pretty image, I think has a certain gravitas missing from a lot of my work.


So how did 500px rate it?

It got a total of zero, nil, null point likes, loves or even views.

So I am left with the question. Why?

There are a myriad of possible reasons but some that stand out are:-

1. It did not get seen. 

One issue with 500px is that with so many images being presented the photo needs a good hook to drag people in. Not only that but the preview shot on the main page,  only shows a small part of the center image. If that small square does not stand out, then this will cause the photo to be skipped over.

Also upload timing is critical. If it is placed when the majority of the viewers are not around, it will be rapidly relegated to the pit of other failed photos. For example, I only tend to look at the 1st 10 pages of the recent photo page, I probably miss thousands of great photos for that very reason

2. It is not a 500px type photo.

 It is quite easy to recognize a photo that will do well on 500px. They tend to be bright, glossy, and vibrant. Black and white images that do well again they are the ones with strong blacks and whites.

This image is not typical of one of those.  If I was to describe it, I would say it was gritty. Not that gritty photos are not liked, but they are less likely to stand out from the crowd.,

3. It is not very good. 

However much we hate to admit it, this is always a possibility.  Maybe its my judgement that is at fault. In some ways this would be the most worrying, which is why I cling to reason 1 or 2.

The problem is how do I know which is the reason (or is it a combination of all 3). This is why negative critic is so important. To become better photographers we must learn to accept the good with the bad, however painful the bad is.Websites like 500px just don't offer this sort of feedback, and we suffer from it(I can see there could be good legal reason why such a service is not offered. I mean no one has ever been sued for giving out compliments)

There is also the opposite issue of accepting the wisdom of the crowds. If 100 people say they like your photo, and one doesn't, does that make your photo good? If the one who dislikes it is a photo judge, they may have better reason to not like your image than the 100 who do. It maybe those faults will become more apparent with time.

So how do we obtain negative criticism?

Friends and family are not likely to be a great source of help here. However one of the best ways is to put it into competition. Judges rarely hold back, and while many judges have learnt that if they want to be asked back again, not to go totally negative, they can often not resist it.

Often you get what I call, the Judge sandwich, where they start of by saying something positive, hit you with criticism then finish off with some platitude. Worse is when the mark they give does not match their comments.

I must admit for a long time I hated competitions due to the negative comments, but looking back I realise they had an important role in improving my pictures. At the present we are are in the society off season and I am surprised by the how much I am missing the lack of critic, good and bad,

Another way to get valid feedback is to form contacts with other photographers and ask for honest opinions.

Sometimes we have to accept that we have a photo that just won't fly. it does not necessarily mean its bad, just that it's time has not come. However if in doing so you learn something then you can gain something from it despite your disappointment

To use the quotation from Moonfleet "As in life, so in a game of hazard, skill will make something of the worst of throws"


Sunday, 21 June 2015

Breaking Bad

To learn anything requires you to repeat an exercise in the same conditions and measure your improvements.

In outside photography this can be a problem, because there are so many variables such as the light, the subject, and the position of the camera. even the lens used and the camera settings.

While often you can extrapolate from one photo to another, it is sometimes nice to be in more controlled conditions.

One way this can be done is via indoor photography. Here you can play around to your hearts content, with all sort of parameters while at the same time taking photos of the same subject.

Of course to do this it is great to have a room set apart for your studio. Unfortunately if you have a growing family, you are unlikely to be in that sort of situation, so instead have to work round the ordinary detritus of human life.

In my case this is the garage. Now like most garages, it has been many years since a car was ever parked in it, and we would struggle to even get a bike in nowadays. Needless to say then it is not ideal as studio,since we  have to fight around tools, drink and various large quantities of wood I have collected  over the ages "just in case" I ever decide to start a carpentry business.

However it has a number of qualities which any studio should have. It is out of everyone's way,. meaning I will not be disturbed. Outside light can be shut off if needed, and with a little re-arranging enough space can be had to set up tripods etc.

The project


 I have always wanted to try my hand at high speed photography, and I had a project in mind to achieve this, and this is where the garage came into play.

The project was to record  the breaking of glass.

Now there appears to be two ways to do high speed photography. Either open the shutter at a high shutter speed in strong light at the opportune moment, or leave the shutter open in the dark and fire a flash at the optimum moment(or a combination of both).

Now both of these require am accurate method of triggering at the opportune time, but the former method is likely to be the hardest, since there would always be a lag between shutter press and activation. So I therefore decided to do the latter.

For this I purchased a radio trigger for my flash. This meant that I could position the flash away from the camera with the trigger close to the subject I wanted to take. Also the trigger had a 3.5 mm din socket that would allow me to trigger the flash by connecting two wires together at the correct moment.

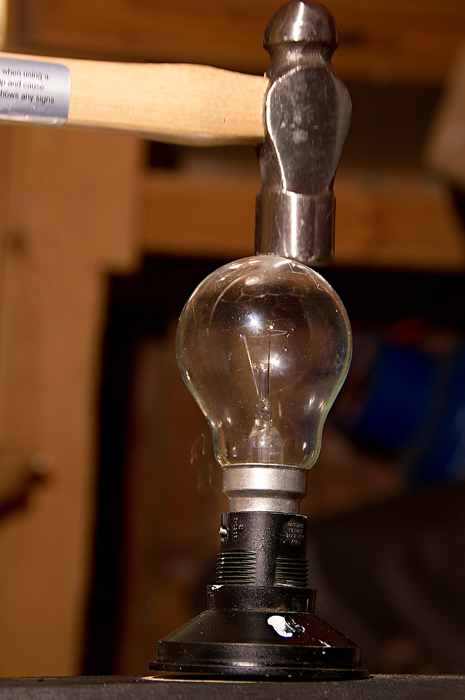
Although  this sounds complex, the real difficulty was triggering the flash at the right moment. The idea was to swing a hammer on a pendulum and at the bottom of the arc meet a glass object. At this point I wanted to trigger the flash.

Now there are a number of ways I could do this. A electronic method could be rigged that triggered the flash if a light beam was broken, or on a sound. However to keep it simple I put a bolt on the pendulum that at some point on the arc would hit a hinge, so make electrical contact and fire the flash. The bolt was used so I could adjust it. The hinge's purpose was so that in theory it would only fire once, since the hinge would fold out of the way.

So how did it go? Well initially I was going to try it with bottles, but I found out that bottles are   actually very hard to break, so I substituted them old type light bulbs which proved far more fragile

This is one of my 1st goes.


As you can see, it worked but the flash fired too early, so although the bulb is breaking it is not quite enough to be easily visible.

However this one was far more successful.


Still I think I can do better. For example the bulb holder has mover as the hammer hit, and it is just a few moments too late.  However I have already learnt some important lessons.

1. I thought I would need to do this in total darkness, which made me nervous of swing a hammer on a pendulum in pitch black with me and camera equipment around. However it turns out that if I set a low ISO, dim lighting is adequate.
2. Triggering is harder that I thought. The mechanism at present sit fires multiple times, which means I have to manually close the shutter, before the 2nd flash. Also adjustment is not as easier than I thought, so i will probably need to redesign the  trigger.
3. Glass gets everywhere, so put sheeting under the work bench and have a way of removing the light bulbs from there holder such as pliers.
4. Get a bigger hammer!. Actually securely attaching the hammer to the pendulum is one of the challenges I need to master. At present I user tie wraps, but they tend to come loose.
5. I will need a lot of bulbs.

Still it is promising. I am tempted to make a electric flash delay that would give be more control on when the flash goes off, but we will see. What I do know is that I will need a lot more light bulbs...


Sunday, 14 June 2015

Please be patient, normal service will be resumed ...

I know I haven't posted much on this blog recently, and you would be quite within your rights to think that

a) either I wasn't doing a lot recently
b) This blog had fallen the fate of many blogs and is now inactive.

Neither is the case.

I have probably taken more photographs recently than for a long time. Also I have a number of projects which I hope to document/describe at some point.

However the problem is time. The more photos I take, the less time I have to process them. This means in turn that I have less time to work on projects. All these mean that blog writing has taken a back seat.

Hopefully more time will be available soon, but in the meantime here are a few images that I have managed to get somewhere near to completion recently.

All of these are works in progress, so are rough, but nevertheless show promise


High key image taking in Nottingham
This was taken in Nottingham during a club photo shoot. to be honest I wasn't greatly happy with the results and I wonder whether I am cut out for going around in groups, but this was one of the better ones. I quite like B&W high key images like these, and this is the closest I have got to getting one to the standard i want.
Playing with glass

The next MPS photography is glass, so I have been playing around with some ideas. This was taken at home against a translucent background, and then heavily processed. As such it is not perfect and needs a lot more work, but shows promise.


Houses
Taken again in Nottingham from the Castle walls. I must admit I am getting a bit of an urban theme going, and I think this comes out well in B&W. It is a nice candid shot of a typical British housing state and as such I think it tells a good story.


Kings Mill over the river

Taken from the river Trent from the Aston-on-Trent side. I took a lot of photos that day, but a lot were ruined (or at least compromised) by a smear on my polarizing lens. But the bright buildings contrasting against  the dark greens works well here

Poppies
I love poppies, but locating a field of them seems harder and harder these days. So when I saw this one nearby I had to go and take it(poppies have a very short flowering time, so you cannot hang around.) Of the photo's the contrast against the local power station seems to work well.


Again playing with Poppies

Again poppies but with a relative long exposure, zooming out. I think it works well and provides a different take on flowers

Tree at sunset

This is an image I am still thinking about. Leaving the large black space at the bottom is probably a competition fail, but.....I like it. I think maybe the composition is not quite there yet, but close


Finally....

On top if that we had a trip organised by the Melbourne photographic society to Nottingham. As a result of this I put this montage together, with some suitable music :). I do like putting montages together and in this case I think it went together quite well..


Wednesday, 27 May 2015

The award for newcomer of the year goes to....

Melbourne photographic NOTY trophy in all its glory

While I am sure most of us do photography for the pleasure of it, to get recognition once in a while is also appreciated.

So I am very please to announce that I am now Melbourne Photographic society's new photographer of the year (or NOTY as it is termed). Since this is probably my first award since I got 3rd place for Karate when I was about 20, it is needless to say I am very pleased and honoured. (I won my previous trophy with the clever ruse of putting my face in front of my opponents fists , so getting them disqualified. Fortunately winning this one came a lot easier ),

This trophy is given to the photographer who has been with the society for less than 3 years and is based on the 10 best scores in society competitions. It also can only be awarded once.

I must admit that my entry to competition was more to help improve my photos, than gain any reward and certainly my early results meant that any idea of winning anything could not be further from my mind.

However now I have received the award, I must admit I cannot help being a little pleased with myself, if for no other reason as it stands as a marker for how much my photography has improved over the last year.

Certainly in early competitions I wondered why I was entering, since I often took the results and criticism personally. At one point I decided I would not enter again, but I did and it resulted in improving my photo's.

It also gives me renewed confidence for next season.

I cannot win this trophy again, but there is the photographer of the year trophy (or POTY). This however will require another leap in the quality of my photos. This year I was about 5th in the overall scores, and to improve on that, a quantum leap in improved quality will be required. I am under no illusions that this will be challenging. Nor will it happen overnight, so I will have to be patient and take the good with the bad.

But still, if nothing else I can approach my hobby with renewed confidence and vigor and if nothing happens, I will still always be the winner of the NOTY