Monday, 1 December 2014

Gerr' off my land

Recently I reviewed Julia's and Joel's rather excellent book on black and white architectural photography, and I was inspired to give it a go. I have been playing around with welding glass as an ND filter alternative, but eventually I gave in to the inevitable and purchased 3 ND filters of various stopping powers(Question: why do ND filters insist on have at least 3 naming conventions?).

The next problem was what to photograph?

Unfortunately I do not live close to any major metropolis areas with soaring skyscrapers, nor close to the coast for those pictures of the sea turned to milk. However I do live rather close to a  major coal fired power station.


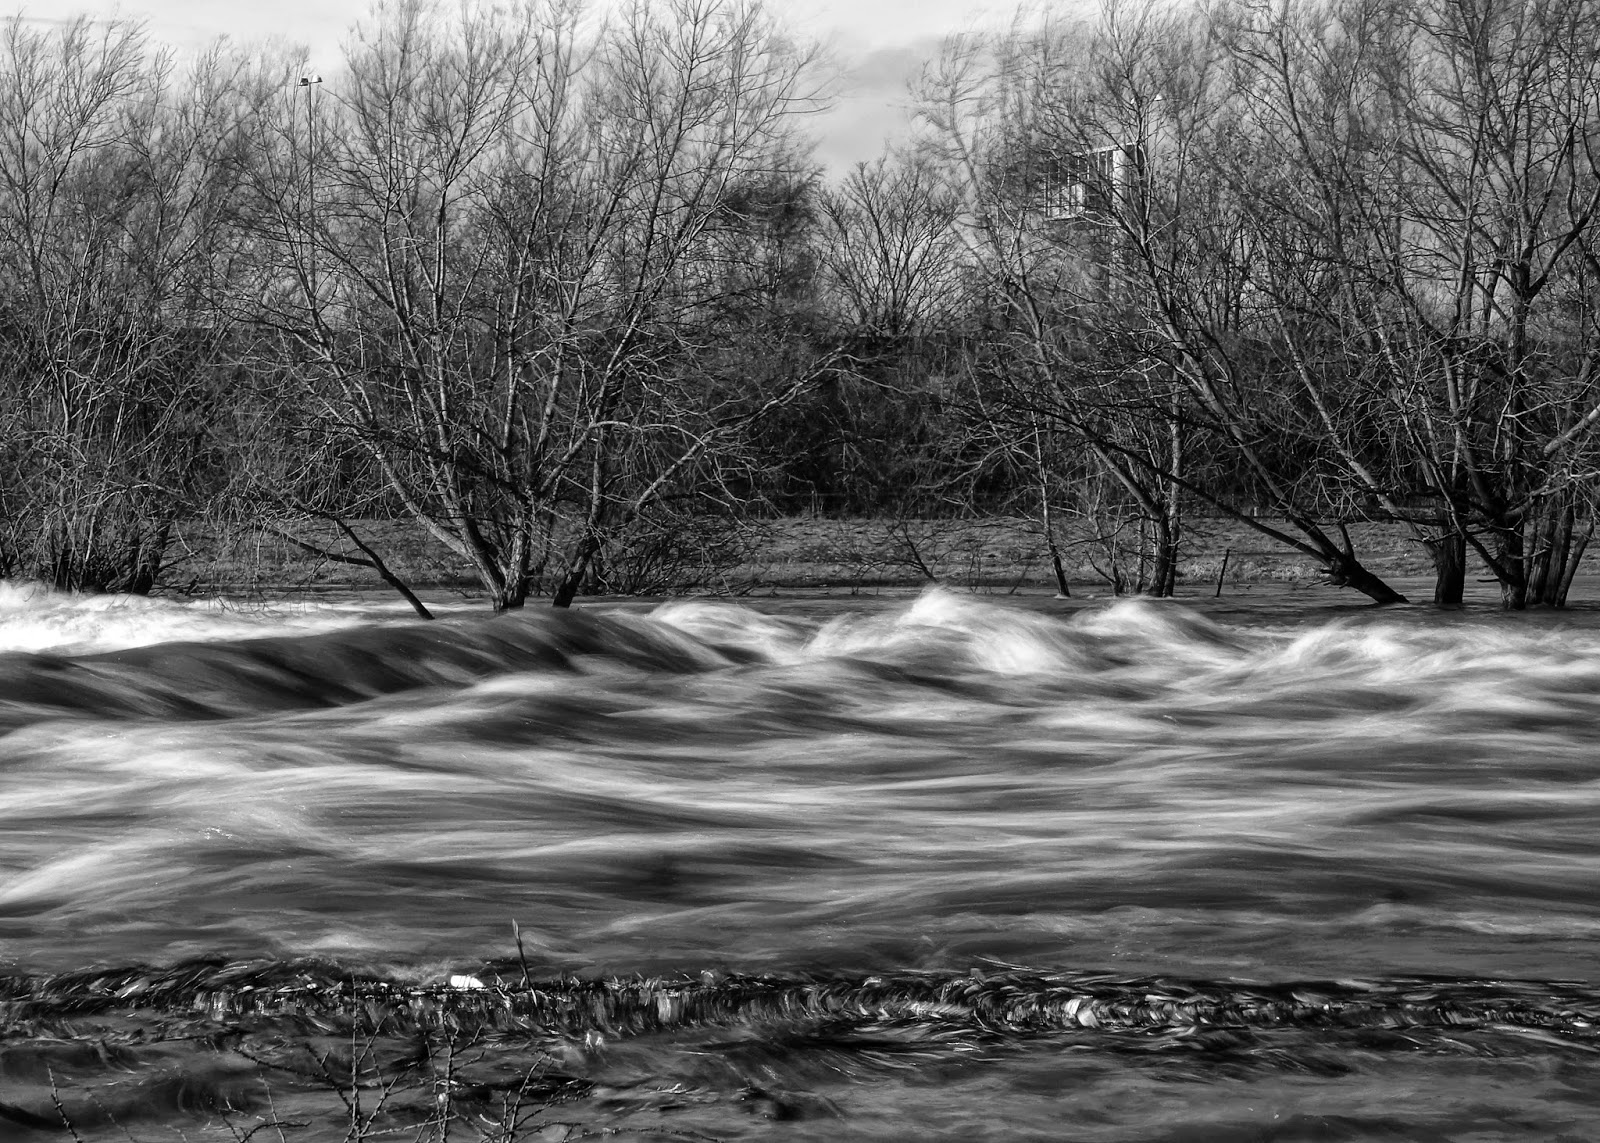
Now I know power station cooling towers are not everyone's definition of beauty, but to me they are the ultimate form over function. Also because they tend to be built in flat areas, close to rivers they dominate the landscape. Best of all for the kind of photography I wanted to do, they produce their own clouds which is useful on a cloudless autumn mornings.

So armed with the filters all I had to do was to wait for 3 rather unlikely events to occur simultaneously. Firstly the weather needed to turn from the uniform gray which we have been suffering from recently to the clear blue skies. Secondly this needed to happen on a weekend. Finally that weekend needed to be free from other pressing family matters. Amazingly this Sunday morning, all three occurred (which to me is  equivalent to winning the  lottery), so grabbing my bag, tripod and camera I set off for the 10 minute drive to the station.

The 1st thing I have to say about this sort of long exposure photography is that it is quite cathartic. It basically involves finding a good position, setting up the tripod, arranging the composition, taking a few light measurements, fitting the ND filter and then opening the shutter. You then have 5 minutes (using Joel's 5MF8 rule) to wander around, examine the scenery ,and look for your next shot, which is much more relaxing than most photographic experiences where you are rushing around trying to get a good shot

Things were going well, but in the corner of my eye I did notice a pick-up trick within the station perimeter, and the driver taking a interest in what I was doing. Now to be clear  I wasn't exactly skulking around. It is difficult not to stand out,  when you are carrying your SLR, all your kit and a large tripod. But sure enough it wasn't long before the same truck came out and the security guard driving it pulled over to ask what I was doing, with the clear undertones that they would rather I stop it.

At this point, it is important to explain where exactly the power station is situated. It is just off  a major thorough fare between two cities and there is a road next to it that leads to a major inter-city railway station. So the place I was standing and taking photos was very much open to the public.

I explained that I was just trying to get some shots of the cooling towers for my own use  and offered the guard my business card (I work for a company that is major producer of electrical  generation equipment, so I offered this to prove that I was not some eco-warrior in disguise). He seemed satisfied and moved off. However 5 minutes later his boss came out(again in a pick up truck ) and asked me similar questions with the same result.

Now to be clear here, both times the guards were polite and made no attempt to threaten me or stop me taking photos. Also I have a lot of sympathy for them. The power station has over the years been the target of friends of the earth and green peace, with protesters invading the site. So they are being paid to be vigilant. Also having a job stopping a power station being nicked is probably not anyone's 1st career choice, so anything that breaks up the monotony, such as investigating someone taking photos outside the perimeter, probably provided the most excitement that they had had for weeks.

However it is at such times when you realise knowing the laws governing where you can take photographs and your rights would be useful.

So the following is what as far as I can tell is the laws governing where you can take photo's in the UK

The legal bit


OK before I start, just the usual blurb. I am not a lawyer and have no legal training. So if you get arrested taking photographs, using this blog is not a valid legal defence. Also the following only applies to the UK, and other countries probably have different rules (i.e. don't follow this if you reside say in North Korea)

With this in mind, this is what I understand to be the case.

The most important point is that if you are in a public place you have every right to take photographs and no one has the power to prevent you from doing so.

There are a some of exceptions to this, such as Trafalgar square and Parliament square, London. But even there, this only applies to professional photography. Tourist snaps are fine. Also if you like taking photos of celebrities sun bathing on their balcony, you can still be done for a breach of privacy (and also pretty shoddy moral standards). But generally the rule is that no one can prevent you from taking what you want when standing in a public area.

For example, one security guard suggested I needed to get written permission to take such photos, but I am pretty sure this was incorrect (and anyway there was no indication where such permission could be obtained)

Private land is different, and generally you need the owners permission.

Of course one of challenges is working out what is public and what is private land. Because I was on a road to a train station via a public highway, I was pretty sure the land was public. If I was on the slip road to the station entrance itself however, it would be a gray area. Unfortunately land does not need to be sign posted as "private" for it to be private.

Although photographing from a public area is a general right, like any such right, there are some government legal get out clauses. Firstly if you are causing an obstruction, you can be asked to move on by the police and arrested if you refuse.  However this is only likely to apply when you plonk your tripod in the middle of a busy thoroughfare.

The 2nd get out clause is if you are taking photos of anything that could give aid to an enemy. This law has been around since 1911, well before anyone thought of satellite photography or even Google maps and is only likely to apply to military installations and even then only the most sensitive ones, but it is something to keep in mind if you like taking things like plane photographs. Taking pictures of soldiers around barracks is also likely to get you into trouble under this category.

The 3rd category is the most wide ranging and the most open to abuse. The 2000 terrorism act has given the police wide ranging powers to stop and search  when in doing so could result in the prevention of a terrorism act. Unfortunately this is a catch all, and you could see how such powers could be brought into force around something like a power station.

This brings us to who has power to do what. The first thing is that civilian security guards, whoever they are employed by, have no powers of stop, arrest or confiscation. This means they cannot arrest or detain you, demand access to or confiscate your equipment.

However they have the power to make your life difficult by calling the police, who for an easy life may well take their side of the argument, until it can be sorted out at the police station. So my advice is always be friendly and polite, however ludicrous their questions are. Secondly like most security staff they are specially selected for there lack of sense of humour or sense of irony. So phrases like " I was just casing the joint to steal one of the cooling towers" however funny in your head, will not help your situation.

However if you are in a situation where you are on public land and someone does question your rights, I suggest the following
  1. Smile, be friendly. Explain you are a photographer, just carrying out your hobby.
  2. Carry some sort of ID. Like I said I gave them a business card, which seemed to help (even though it could be easily faked). A photography club card could be useful in these situations. You are under no legal requirement to prove your identity when asked, but there is no reason not too and any card will probably end in the bin anyway.
  3. If they do ask you to move on, you can then ask them why and if necessary explain to them politely of your legal rights. Phrases like "make me, copper" are unlikely to help the situation. If they insist, ask for their name and their supervisors name.
  4. If they try to confiscate your equipment or delete your photos', warn them you will ring the police. If they continue to try, do so.
  5. If the situation starts getting heated and they won't back down. Pack your stuff, and walk away. It is after all a hobby, and really not worth chaining yourself to the railings over. By all means complain to the company involved (plus any local news papers for effect)

In truth it is unlikely to get past point 2, unless you meet a very inexperienced guard with a Napoleon complex. Remember also that their bosses are unlikely to welcome any adverse publicity such an event would occur.

In my case we did the usual British dance where I answered  politely his questions and restrained myself from reminding him of my legal rights, and he did enough to make me uncomfortable about being there, without actually suggesting I was in any way wrong. After both of us had fulfilled our roles, we both went back to our jobs in hand.

However some of the questions did confuse me. He asked whether I was a professional. That is always a difficult question for me. Does he mean in my outlook? Does the fact I have sold 2 photos in my career count? Anyway what difference does it make legally?

The 2nd question was whether I had a Flickr account. Maybe he was trying to a trick question to see I really was a photographer on the basis that Al Queda  only use snapchat? (I lied here, I said no. I do have a Flickr account, but haven't used it for years.). Again legally it seemed a strange question.

Unfortunately as the world moves from crisis to crisis, and the paranoia levels rise and fall with them, it is easy to fall a cropper to such situations. The important thing is to be aware of your rights, but not to use them as a blunt instrument against any figures of authority.

Yes, right might well be on your side, but if you are not careful, it may only come to your rescue after a significant legal expense and battle. So you have to ask yourself, is it worth all that hassle to take a few photos?

References 

1. http://en.wikipedia.org/wiki/Photography_and_the_law
2.  A very useful downloadable guide can be found here - www.sirimo.co.uk/ukpr
3. Advice from the UK Metropolitian police - http://content.met.police.uk/Site/photographyadvice


Monday, 17 November 2014

10 shades of grey - A book review

The Trent in flood. The kind of photo I hope to do better


I don't remember where I first came across Julia Anna Gospodarou and Joel Tjintjelaar's work, but something about it definitely piqued my interest. As always it is difficult to quantify why a particular piece of art catches your eye, but the use of long exposure was probably part of the reason. One of the things that has always fascinated me is how photography can play with the way time is represented and perceived.

If you set the shutter speed short, you capture the fleeting instant of an image, in a way that would be impossible to discern with the naked eye. On the other hand, use a long exposure and all those quantum instants blur into one, to create a totally different photo; a summation of all the instants, resulting in the smoothing of the dynamic elemants, and the highlighting of the static, non-variable objects.

Maybe its the ex-physicist in me, but I like the idea that each photo can be thought of as a unique recording of a single point in space and time and one that can never be repeated. This is something I find both fascinating and humbling (or just as an excuse for lousy photos. "Hey, I know it's not great, but it is unique"). It is one of the reasons that I am drawn to (re)photography with the concept of taking two photos separated  not by distance, but by the 4th dimension (also talking like this is why people tend to edge away from me at aprties :))

The technique of using a high end ND filter on the end of the camera, placing the camera on a tripod and taking long exposures to smooth out clouds and water is not a new technique. However Julia and Joel's photo's have an extra wow factor. Their photo's result in images that seemed to transcend normal architectural pictures, producing images that would not look out of place in some 1930's utopian science fiction novel.

The photos are often composed to show strong geometric or symmetrical forms. Seeing and taking such shapes has always been somewhat challenging for me. I struggle to separate such shapes from the surrounding clutter. The ability to see, compose and take such images is an area I have always wanted to improve in my photography.

So when I saw they had written a book out I knew I had to get it ( even though £40 is expensive for a book, and even more for a e-book, ),

This is my review of that book   

En)visionography-From Basics To Fine Art – B&W Photography – Architecture & Beyond

Rule 7. Be Different, Be original, be personal


The first part of the book is the setting out the authors vision and philosophy.

Julia has termed her photography as "(en)visionography" which she defines as follows

"The process of using reality as a tool for 
translating one's inner self and representation 
of the world into an art object that can make 
others react and feel emotion"

This is based on the concept that what we produce today is not the simple taking of an image as in the photography of yesteryear, but is now only part of a much longer process towards realising our final vision of our image. Today the raw image is further finessed through tools such as Photoshop which takes as much time and effort as the actual taking of the photo. The picture itself is just the raw materials.

However the important part of this process is having the clear vision of what you want the photo to show and a plan on how you wish to get there.

Julia sets out 35 rules which she feels will help anyone achieve their vision. The rules are not so much technical, but more a personal philosophy on how to achieve your own style. This is a theme that Julia revisits regularly throughout the book and it is clear the she has given a lot of thought about her own motivations.

It is hard to argue with any of the rules, and some certainly hit a chord with me. For example rule 21 is "Try to be unconventional, even if you are not accepted". This matches much of how I feel that a photograph should provide a unique viewpoint of the world and should not simple be a copy of similar work.

The next chapter is a master class on composition. Like I have mentioned before, composition is an area that I feel I struggle at, and Julia gives great advice on ideas of how to approach composing an image. It is here that her artistic and architectural background shows through, with advice such as taking inspiration from the great masters of art such as Vermeer.

In truth though, good composition is one of those skills that cannot be easily be taught, but only gained through trial and error. Also it is easy to get too analytically about composition rules. For example a photographer told me once that when taking pictures of buildings, one building line should always be parallel to the pictures edge. However that is a rule that Joel's and Julia's pictures often break to no apparent detriment. This brings us to the last "rule" about composition that is once you have learned the rules of composition, you should then learn when to break them.

The following chapter concerns the use of light and is equally illuminating (sic). Since the authors work is in generally in black and white (more accurately in tones of grey), it is essential to understand how light affects the subject and how these can be manipulated to produce the image.

This is where Julia introduces the concept of photography drawing. This is thinking in a visual rather than a literal way when approaching a subject. Julia's approach is very akin to the approach an artist would make when sketching a subject, using shading to create form rather than relying purely on the lines to create the form. Unfortunately since my drawing abilities are virtually nil, this kind of approach will always be a challenge. However it is interesting to see the parallels between photography and drawing, especially in the use of the different tones.

Again the chapter completes with a number of rules for photography drawing such as "show space and volume, not only space" and the steps to get from your raw picture to your vision.

To help achieve "photography drawing", Julia describes how to utilise the tonal range. This is based on a system used by the great American landscape photographer Ansel Adams and shows how a black and white image is broken down in a set of tones, Joel expands on this with the "rule of grays" which allow us to separate components of the image based on tonal grays and the manipulate these to create the final image. This is a useful chapter if not least because it is one of the few which provide a practical demonstration of creating an image.


Rule 30. Do not rely on your gear or software to do more than it is supposed to do: Be a tool


In Chapter 13 Julia suggests possible areas of architecture which will make interesting subjects and follows this with suggestions on how to shoot architectural details and some general principles on camera settings.

It is here where we start getting into descriptions of the various pieces of photography equipment required. The truth is much of the kit specified is not cheap, and it would of been useful if their had been more acceptance that some of this kit is out of the price range of many amateur and hobbiest photographers. There is also a long description on the physics and use of tilt shift lens. While interesting, this is not a lens you are likely to have in your bag unless you intend to make a career taking photos of buildings.

By chapter 19 we get back to the concept of building photography as an art, by looking at abstract photography with some good advice about finding new angles by tilting the camera so to represent buildings in new and interesting ways.

The next chapters look at different types of architectural photography such as skyline, night and street photography, together with the different issues and techniques of each. Finally we get a chapter on classic or realistic photography which is more designed to cater for those who wish to make a living from traditional building or real estate photography.

In Chapter 24 they touch on HDR photography, which is a subject that is widely used (and abused) today. There was also the mention of EF (Exposure fusion) photography although I felt the book did not really describe the differences between EF and HDR and how the former is achieved.

Finally their is a look at Infra red photography. I must admit I have a yearning to try this sort of image making, but the cost of getting a camera converted makes it difficult to justify (as an aside, I wonder whether Sony DSLR's would be great for this work with their translucent mirror technology allowing the equivalent of continuous live view)

Rule 16: Slow down when photographing a place (The Art of Long Exposures)


Chapter 26 is where we get into long exposure photography.  There is a lot of good advice on the long exposure technique and how to go about calculating the correct exposure. While little was new, it was well described and explained.

One of the things I realised after reading this chapter was that one of my problems with such long exposure photography was that my ND filter is just not dark enough. Up to now I had been using a ND10 filter (actually it was a bit of welding glass stuck to a filter ring, but that's another story), when really I needed to go to ND13 or even ND16 to achieve the kind of results I wanted. Joel also introduces the 5MF8 rule which is basically that you should aim for an exposure time of 5 minutes and a aperture of F8. In order to achieve this you needed enough ND filters to achieve the necessary reduction in overall exposure.

Julia's final chapter goes back to her artistic philosophy, where she discusses the need to create the perfect vision of what she feels is beauty by using all the tools at your disposal. She discusses her workflow when she approaches a subject and the steps she goes through to get to the perfect picture.

Finally Joel discusses processing in Photoshop using what he terms iterative select gradient masks. or iSGM. This is the process of selecting various element of the photo and applying gradient mask on these to naturally merge the objects by introducing smooth transitions between the various gray tones.

(There is also a chapter on pricing for professional photographers which for obvious reasons held little interest for me)


Conclusion


So how did I feel about this book? Did it meet my expectations?

I must admit I balked at the price. £40 is a lot for a book that you cannot physically hold in your hands, and I must admit that I am still old school enough to feel that e-books are a poor substitute of books that you can hold and cherish in your hands.

Hopefully one day they will get around to producing a dead tree version. However I am sure a book of this size (423 pages), containing so many high definition images would cost far more if on paper, so maybe I am being a little churlish here.

Putting aside the issue of cost, the real question was whether this book met my expectations and whether it will help me to become a better photographer?

When I read the book for the first time, I did find myself getting a bit irritated about t the books emphasis on the requirements for high end photographic equipment (As stated in this blog, my philosophy is that photography should not be limited to only those who can afford the best equipment). Reading through the book again I realized that I was being harsh here and actually there is lot advice for those of us on more limited budgets.

For example they fully accept that a tilt-shift lens is an expensive and specialist piece of kit. If this is an area of photography that you wish to make into a full time career, then it is a must have lens. For us occasional amateurs however, it is at the end of a long list of equipment that we may one day get, but not a priority. I must also say that the photos I found best were ones which did not require such a specialist lens

(To go totally off topic, one photo hobby I have had over the years is (re)photography - taking the same image from the same viewpoint many years apart and super-imposing one on another. I used to get very frustrated that I could never match some photos up, till I realised later that many of the originals were made using the old view cameras whose flexible canvas design allowed the photographer to basically tilt-shift the camera, so distorting the produced image from the actual scene)

However I would of liked to have seen more of concession for those of us who cannot as yet aspire to the best the photographic world has to offer. For example, I am sure the Formatt HiTech ND filters are the best available , but their price also reflect this. What they did not explain however, was why the fact that cheaper ND filters can introduce a red colour cast to the final image will affect the final photos, when in the end they are destined to become black and white images? Similarly while the Topaz B&W plugins no doubt make the process easier,  I would of liked a discussion on alternative techniques such as luminescence masks.

My other criticism of the book is that although there is a plethora of detail on the thought processes and techniques used to create their images, it is left up to you to bring all the pieces together. I felt that a worked example describing work flow from choosing your subject to the final processed image would of been a useful addition to the book and help create a common thread throughout the book.

However these are relatively minor criticisms when offset by the book strengths. For example the chapters on the use of light and composition techniques are worth the price of the book in themselves. I see myself re-visiting these chapters often for inspiration

Of course one of the problems with a book on architectural photography is where to find the subjects. If you live in one of the worlds major metropolis, this should not be a problem. For those of us who are not so lucky(?) we have to be more imaginative when locating subjects, Saying that, there is no reason why many of the same techniques would not equally apply to other forms of photography such as landscapes.

So in summary, how you feel about this book will probably depend on your attitude to photography as art. While the book contains some technical information and process descriptions a large amount of the book is taken up with discussions on the philosophy and motivations of photography and (en)visionography is general. If your interest is purely in the technical side of taking photographs there maybe better books for you. Personally I found the artistic element fascinating and and invaluable.

It is great to read a photography book where the artists describe not only the technical operations, but also their motivations and philosophy that drive them. In the end these are the elements that shine through the pages

This is a book that I am sure I will re-read many times and is a must for anyone interested in improving their architectural or landscape photography. 


The Book


(En)visionography-From Basics To Fine Art

Number of pages 424
By Julia Anna Gospodarou and Joel Tjintjelaar

Links


Book Download Links - http://www.bwvision.com/book-reviews-basics-fine-art/
 Julia Anna Gospodarou blog - http://blog.juliaannagospodarou.com/
Joel Tjintjelaar website - http://www.bwvision.com/
(en)visionography facebook page - https://www.facebook.com/groups/envisionography


Sunday, 9 November 2014

Location, Location, Location

Sutton Park Exmoor Pony - seemingly unaffected by the rain and oblivious to visitors(dogs or human) 

It is easy to get hung up about where you take your photographs.

When you see photos taken in Italy, China and other exotic locations, it is easy to fall into the trap of saying that your own photographs would be so much better if you too had access to such places.

For example John Wesson, a local photography club member and TV star , frequently commutes to to Kerry in Ireland, which is about as far West as you can go in Europe without standing in the Atlantic. There is no doubt that the area is stunning, as are his photos, and some part of me says if only I had the same opportunities, I too could reach the same standard 

But another part of me knows that this is just an excuse. If you look around your local area, there are plenty of places close by where you can take great photos if you show a bit of imagination. 

Also the location itself is only one part of the equation. If you go for a week to say, Venice, the first 3 days will consist of just trying to find the best photo shots. This is why so many photos get taken from the same location. We see photo's of the location on sites such as 500px and instantly gravitate to them because it is easier and quicker that trying to find new and different viewpoints. This results in photos that are best derivative, but not extraordinary.  

This is where local knowledge and and appreciation of your surroundings become important. John takes great photos not because he is in a beautiful location, but he know the area intimately and for any given weather and time of year knows where to go to get the best shots(Admittedly John's skill plays a fair part). 

This is why taking photos in your local area can work to your advantage. 

The problem is that as they say familiarity can breed contempt. For example I used to live in the North of the country close to the Peak District where from my kitchen window you could see the low hills of Kinder Scout. Despite the views and vista's on offer just 10 minutes away, it was amazing how many of the locals would spend hours going to places like the Lake District to walk and ignore their local area.

I realised recently that I was guilty of the same when I was trying to work out where to go to take photos of trees for a project I have in mind. I wanted an area with a wide diversity of tree types.  I looked on Google maps to try and work out where such a location might be. There were a number of possible areas. The problem was how long would I have to spend wandering around finding the right shot.

Then I had a epiphany. I grew up just outside Birmingham. One of may happy hunting grounds was Sutton Park  where I would often spend the whole day cycling and walking(Remember this was in the days when parents were happy to let their children disappear for the whole day, with no hope of contacting them). 

Sutton park is the last remaining remnant of King Henry VIII deer hunting grounds and as such is one of the few remaining areas of untouched wood and heathland in the Midland area. Not only that, but I knew the area intimately, meaning that I had a good idea of the locations I wanted to go to. However because of my familiarity with it, up to that point I had not realised how unique and special the area was.

Unfortunately, as so often happens, the weather gods did their best to spoil my day, by providing persistent rain, interspersed with brief periods of torrential rain. This meant that I did not really get the photos I wanted(and the ones I did like were often spoiled by rain smears on the lens). 

However I did have a fun time putting my new tripod through it's paces. Using it in anger, so to speak, for the first time outdoors has convinced me I made the right choice and it will be a great addition to my equipment. I was especially impressed by it's versatility, allowing me to take landscapes and macro shots with great ease. 

Couple of puffballs, say the macro capabilities of the new tripod

So although I did not get any great shots, I can be content with knowing that the locations are out there, it is only my technique I need to improve and that is under my control.


Friday, 31 October 2014

Survival of the fittest (or the art of selection part 2)

I wrote previously about the necessity of putting yourself through the pain of photography competitions. However there is another type of event that makes that pain pale into insignificance.

The selection evenings.

A selection evening is where the society as a whole choose which photo's are to be put forward for external competitions, normally against other local societies. The purpose is to choose the best photo's which the society members have to offer. This is to maximise the chances of winning the competition (and associated bragging rights).

This means the standard is higher than the internal competitions since it should consist of the best of the best. This also means the process of selection is tougher too.

Instead of independent external judge offering constructive criticism, the photos are exposed to the unfettered emotions and critic of the society members. In judging the worth of a photo, it is fair to say that some people really don't hold back if they do not like a particular photo. As a result you have to be pretty phlegmatic and/or thick skinned to put your photos through this process.

As with any form of process based on groups of individuals with a large dose of self interest, you often get to see writ large the undercurrents of society politics. In theory the selection process should be unbiased and anonymous, but club divisions, prejudices and member versus member rivalries often come to the fore.

It is also interesting to see some of the attitudes of the members to selection night. Many, knowing the savagery of the process will not even enter. Some just profess ambivalence or disinterest in the outcome. However this is usually just a face-saving fallback position, in case their photos are not selected. I am pretty sure anyone who places their work in the position is interested in the result, even if they pretend otherwise.

but this is almost always false and just a convenient excuse, in case the members do not share their opinion on the quality of the photo. I am pretty sure, no one puts themselves or their photos through this grinder of process unless they were deep down expecting to succeed.

There are many ways the society could manage the actual selection process. The way that the Melbourne society has decided to do it is that the images and prints are shown and anyone can comment on the image. Generally a photo's instantly fall into one of 3 categories. Instant rejection, instant acceptation or borderline indecision.

It is that last category that is the toughest. It is the ones which will most likely divide and polarise the membership, and it is these that end up with the toughest critiques. Often there is one person in particular who is most strident on their dislikes of a particular photo. Either they see something they particularly dislike, but sometimes it feels that they dislike the idea of someone else impinging onto their area of specialty. It is noticeable, that even in external judges, that they reserve their strongest criticism to the area where they are considered experts.

Also this is where the internal alliances in the society tend to come to the fore. It is often that lone voice that sways the others to reject a particular photo. Also it is also noticeable that while people are quick to offer there dislikes, strong support tends to be less vocal and restrained.

In fact the hardest thing about the process is that there is no right to reply, no capacity to counter what you feel is unjustified criticism. If you are not someone comfortable with publically expressing your opinions then you can quickly feel alienated in the process.

When I first went to the society I naively entered my photo's in the first selection evening, and was feeling my bruised ego for months later. I promised myself that I would never do it again. How at the last moment I relented and entered 3 photos.

Why?

Well it was not that I believed that they would do any better this time. However I realised it was an opportunity to get some early feedback, however harsh, for later internal competitions.

So how did they do?

Well they did far better than I thought they would, with 2 passing the first hurdle and falling into that borderline indecision category and being held back for later consideration.

Made the second round, but not the top 15


Top 16, so close, but so far


This one of the deer was very close of going forward into the external competition proper. It was initially in  the top 15 selection , but opinion was very split. One individual in particular did not like the lighting and the cropping (coincidentally they had 3 or 4 wildlife photos of their own).

Did I feel the criticism valid? Not really, and I doubt that I will make any major changes for the later wildlife and natural history competition later.

In the end it was not put in, replaced by a photo that had been initially rejected, but was put in with the promise of additional editing.

Were the society correct? Did we get the best 15? I don't think so, but then again I would say that wouldn't I? The final proof will be in the competition and I for one will be very interested in how the picture that replace mine fairs in the competition proper.

So it was a night of mixed emotions. Pleasure, annoyance, joy and sadness. But as they say, that which does not kill you only makes you stronger.

While I am disappointed in coming within a hair breadth of reaching the top table, I can take a lot of heart that I am getting closer to the level I want to attain. What I need to do now is push on and take my photos a next level where the images stand out and out of that zone of indecision.

The important thing is that I can see visible progress and I have to take heart from that.

PostScript

The photo that replaced mine has gone on to do well in competitions, while the deer one, less so. So I am willing to concede in the end that the society made the correct choice. 

Tuesday, 28 October 2014

A voyage round my parents

A monkey in a dress? No, me in one of my 1st photo shoots.


Recently I have set myself the project of scanning my late fathers old photographic slides.

Doing so feels a bit like doing a archaeological dig. You are looking at images probably not seen by anyone else for many years(The problem with slides is that they require considerable outlay in order to display them properly). You are never sure what treasures might be on the next slide.

Of course the hope is that you will find something historical significant such as a picture taken on a grassy knoll in Dallas in 1966, but alas the majority of the photo's consist of the family snap variety,

The only one that stands out is of Talbot house, the home of the Toc-H organisation in Poperinge, Belgium, taken in 1965(One of the mystery's is that my dad only seemed to of taken one photo in Belgium. Obviously he was having too good a time ).


Talbot House, Poperinge, Belgium, 1965


That doesn't mean that all the others are worthless, Every photo is significant to someone. Most of the photo's were taken before I was born (or even conceived), and document and record a period in my parent's life that I could not and did not share (My kids also believe that we as parents had no life before their existence). For that reason alone, it has been a fascinating voyage of discovery

But in undertaking this task has raised some interesting thoughts on photography in general.

The first is how photography has changed. It would be easy to complain that many of my fathers photo's are poorly exposed or not in focus, but unlike now, my dad did not have the luxury of auto-exposure or auto-focus. In fact for that reason alone, it is amazing how many of the photo's are in-focus and well exposed since he did not have the luxury of reviewing the photos.

It is also a pity that more of the photos did not show things like the town he was born or lived. But in those days each photo was a precious thing, since you were limited to 24 or 36 per film, and each photo had to be developed at a not inconsiderable cost. There was not the luxury of taking speculative shots just to see how they looked. So photo's were reserved for the things that really mattered such as family. While the digital revolution has meant reduced the cost of photography to almost nothing, it has in some ways also reduced the value. Instead of crafting the photo's we now employ a scatter gun approach, happy in the knowledge that we can delete the ones we don't like later.  In some ways, the old restrictions mean that those old photos will always be more valuable, if for no other reason, their rarity.

The final lesson is legacy. Since these are now one of the few permanent records of my parents existence, they are very precious to me. However as a child, they meant very little, and for many years sat in old boxes, unseen and un-cared for (I guess the modern equivalent is the digital photo frame, that never gets turned on ). Unfortunately the slides condition pays homage to that fact, with many that are scratched or dirty despite my best efforts to clean them and processing in Photoshop.

But at least they are a permanent reminder, only requiring me to awaken my interest in them as I became more involved in studying my family history. I do wonder sometimes whether I will  leave my children a similar legacy.

Already I have a far greater number of photos to share with them than my father could ever of dreamed of, but the majority are stored on disk drives in digital format. Will these  still be accessible when my children reach the age when they start asking the same questions? I know I should really print them off, but the low cost of digital photos now works against us. It would be impossible to print them all, but then how do I choose which ones are significant and should be recorded in a more permanent way?

Like my fathers photo's, those that I consider important today, may not be the ones my kids wish to see in later years. It is a dilemma that many of us face, but unfortunately one we will probably leave to our children to resolve. As I found with my father, by the time I was ready to discuss these issues, it was already be too late.


Friday, 24 October 2014

Competiton time

One of the burdens you have to face in order to become a better photographer is to face the criticism of your work. So it was that I placed my work in order to be be judged in Melbourne photographic society's yearly themed competition.

The competition was based around a theme or word. This year was based around the word "Opulent", which apart requiring a lot us to go searching for a dictionary, was not met with any great enthusiasm by the majority of the society. Even the person judging the entry said that it was a theme he was unlikely to be taking back to his own society.

On the other hand, despite my own misgivings, I actually warmed to the theme. Unlike last years transport theme, it required a lot more thought and effort and forced you out of your comfort zone.

I entered 3 DPI photos and one print. Because I had actually spent some time thinking about the theme, I had high hopes this year. Not of winning, but hopefully being held back, which is the equivalent of reaching the top table.

Now photo competitions are a bit like exams. I doubt anyone actually likes them, but they are a necessary way of marking your progress. On the other hand no one likes having their hard work and effort critically dismembered. Not that judges tend to be over critical(they know if they are they will not be asked again), but it is easy to get very sensitive about any critiques.

The judge, Alan Roswell, was actually very good, and although you could argue about some of his selections, his comments generally were valid. One annoyance though is that  although photos are given a score up to 20, all judges seem determined to only mark them from 12-20. While I know they are trying to be kind, it mean that you have a compression of marks and makes it difficult to differentiate between photos.

So how did I do. Well bad, ok,ok, and ok.

Firstly the bad.


This one got 12 marks, which was basically bottom of he heap. The worst thing however, was that he was right, and I already knew it. His main complaint was that the 1st cake, which dominated the image was out of focus. This was a photo I took at the May festival, and it was only when I reviewed them later that it occurred to me that this could be used as part of the opulent theme.

However I knew it was flawed, and if I had realised it earlier I would of gone and taken it again. I put it in the competition, more in hope than with any logic and it got what it deserved. However despite the low mark I learned an important lesson. If you do not believe in a photo yourself, don't submit it, even just to make up the numbers.


The 2nd photo was this one.


Now I was quite proud of this one, and to be fair the judge liked it, but he was put off by the fruit in the top left corner. Looking at it on the big screen, he may have a point, but even so I thought it deserved more than 16(Actually there is a spot on the photo I find even more glaring)

The 3rd photo was my print.


Now irritatingly the judge had no real criticism of this, in fact saying it would make a good patterns entry photo.  For a fleeting instant I thought he would hold it back, but in the end he gave it a rather disappointing 16. The only reason it did not score more I can think of, is that the judge a) did not think it showed 'opulence' (if so, I disagree) or b) he had already made up his mind that there were better photos to come.


The last photo was this one


The judge seemed to really like this one and gave it 17 marks. The only thing he complained about was the leaf at the bottom, which he felt distracted from the image. Again it was valid critic. I really need to develop a judges eye for these things so that I can spot and correct issues before I submit them.

So after all that, some good marks, but I have still not quite met the standard I want.

I did however learn from the experience. Firstly the difference between the top and the almost ran is very small. Also for competition entry you need to learn to look at your photos like a judge does and correct those small issues. Finally I learned a lot just from seeing how people frame their photos, which can make a lot of difference to the final image.

So good, but not quite there yet. We also had next years theme chosen. We missed a number of bullets on this one. It could of been architecture(too broad), romance (just uugh). In the end it was glass, which I think has the right blend of not being too prescriptive, without being too broad

My next decision is whether I want to put any photos for selection in the external competition. Compared to internal ones, that selection process is even tougher, so it is something I need to mull.


Sunday, 19 October 2014

Something old, Something new, Something built

Photo of fruit using my new tripod and light table


As a photographer, I love getting new toys to play with. Unfortunately while I would love to splash a 1000 notes on a new lens or camera body, I have to be more realistic.

However this time the stars have aligned and I have 3 (Yes 3!)  new toys to play with (well new to me anyway)


Something old

My most recent project is taking photographs based on the "Opulent" key word. My ideas pointed to some close up photography, so I needed a macro lens (I had bought some macro extensions recently, but I have not been greatly impressed by them)

Looking through my motley lens collection, I was aghast to find that only one of them had a macro switch and that was my 300mm zoom, which wasn't really the easiest one to use for close ups. So I resorted to the last hope of the cheap and desperate and went to flea-bay. I managed here to get an old Minolta 35-70 zoom with a macro switch for about £30.

Now this is not the best glass in the world. It's only 49mm wide and has a maximum aperture of F/4, but on the plus side it will focus to 30 cm with the macro enabled(apparently the camera is designed so that auto-focus is disabled in Macro mode, but that's not a great issue ).

I don't think it is a lens that will sit on my camera when i'm out and about, but for taking detailed close ups in controlled conditions, it should be fine.

Something New

Toy number 2 is something much more impressive and expensive.

As I mentioned in this blog before, my present tripod showed that it just wasn't up to the task (not surprising really, since I think it cost me the princely sum of £25). For the kind of projects I was envisaging I decided I really needed a new one.

The first problem was price.

Decent tripods start at £100 and rapidly increase from there. If you want to go for the super dooper carbon fibre special, you can easily spend over £300, which was well outside my price range. On the plus side, I had a birthday coming up, so I worked out that if I forgo all other gifts and blackmailed relatives and friends then it would be possible to get a decent aluminum job.

Then the second problem. Which one to go for?

Starting from scratch, it was difficult to know what to get. Even by excluding those made of the more exotic materials, it still meant I was left with quite a large range of tripods to choose from.

My biggest surprise was that tripods and the camera mounting heads are generally sold separately. The heads however can cost almost as much as the tripod itself. Now while this makes sense if you already have a existing head from a previous tripod, but it does feel akin to buying a car and then being told the engine and tyres are extra.

Anyway with my budgets fixed, I had to decide my priorities.

Firstly while portability would be useful, it was not critical.  As long as it could be carried in some form for a few miles I would be OK. After all I had no plans to take it abroad, up Everest etc. (not at present anyway).

My experience at the flower show had showed me that my key need was adaptability. After all this was likely to be my only tripod and would have to be suitable to do all the tasks from landscape to macro photography.

This need in turn directed me to the Vanguard Alta Pro 263AB 100 Aluminium Tripod.

Firstly it was just about in my price range, even with a included ball head. But best of all it had a great trick, in that the centre column could swing out, so that it could be placed at any angle from 0 to 180 degrees.

So this was the present I requested from my loving family(It's best in these situations to be specific, otherwise you get something which is half the price and they consider is just as good, but isn't). So it was that a present in the shape of a long parcel awaited me on the appointed day

So what are my first impressions?

Firstly it is bigger and heavier than I was expecting, but not so to make it unmanageable. However this is not designed as a travel tripod you can stick in your rucksack. It does however come with its own carry bag.

The first challenge is to work out how to use it. Tripods always seem to consist of a number of knobs flying in close formation. Therefore you really don't want to try and use it for the first time on a mountain top in the dark.  However it did not take me long to work out the basic mechanics.

The swing arm is a great . However you have to be careful using it, since fully extended it does make the tripod a tad unstable without adding extra weight on the other end of the arm. I was often very nervous that there was a serious danger of it plunging into the ground and in doing so useing the camera on the end as ia very expensive crumple zone.

The legs are easily extended and can be moved so that the tripod lies almost flat to the ground. The feet can either be spikes or rubber by screwing/unscrewing them.

It also comes with a spare camera mount plate and a tool for adding/removing it. However putting the plate on the camera could of been easier.

The included ball head itself is easy to adjust and very stable

So far I have been very impressed with it and I look forward to using it considerable as the dark nights draw in.


Something built

My third toy is something I made with my own fair hands.

I had a project in mind, partly driven by the photographic society competition based on the Opulent key word. In order to do it however I required a light table.

I looked up how much it was going to cost me to buy one and I was a bit shocked by the prices of just a modest one.

The bigger problem however was where I going to keep the table when I wasn't using it?

I have a small corner of a room dedicated to my photo kit collection. It is increasingly expanding as bits of kit get added(am I the only photographer who loathes to throw old photo equipment away?). Although my long suffering wife doesn't say anything, I can see in her eyes, her disapproval. So I had to ask myself,  did I really want to buy a light table that I might only use for one project, which would be forever more littering the house?

I therefore investigated alternatives. The first idea was to use a old LCD monitor. Monitors have a in-built LED back lighting, so if you replace the front screen with a piece of translucent perspex, you can re-purpose them as a light table. However the first issue was where I would get a old monitor? The second was where would I store a hefty and large monitor when it was not in use?

This was when I hit upon this link. The concept was to take a £5 IKEA table, rip out the innards and replace it with LED lighting and a perspex top.

Now I not the greatest D.I.Y proponent, but the skills required looked within my range, so I decided to give it a go. I got a IKEA Lack table (I went for the deluxe shiny table at the extortionate cost of £10) and ordered the required lights and perspex. I then proceeded to hack away at the table in the proscribed manner.

In the end the only serious issue was when ordering the perspex from Trent Plastics  in that I forgot to hit the add message button telling them of my cutting instructions. the meant that the plastic sheet was too large and had to be re-ordered.
Best Scandinavian woodwork before...

and after...A working lightbox/cofee table


The result was a light table larger in size than any I was considering purchasing, and about the same price. But best of all, when it is not being used it still functions as a pretty decent coffee table so doesn't need packing away.

In use, the results have been pretty good, and I have a number of projects in mind to use it with. I am also using it to view some some old family slides. My eldest daughter is already eyeing it up for use as a tracing table for her art work.

So 3 new toys. Happy days.....

Tripod, Light Table and camera in action...