Saturday, 24 October 2015

The extra 1%

Why I am not a landscape photographer...


As Chris Newham, the guest speaker on Thursday at the MPS intimated, there is a myth among some that landscape photography is easy. After all landscapes do not move, you don't need fast, long lenses and nor does the scene change rapidly so rapid continuous auto focus is not required.

All you need is a camera, a location and a few minutes to snap away.

There is some truth in that, but in all things it only goes so far. As the speaker able demonstrated, the difficulty is not taking landscape photos but that final 1% to get an outstanding landscape shot.

That means getting to your location 1 hour before dawn on a winters day (probably after a good 3 or 4 hour journey, since the best locations are almost always a long way from population centres), standing in an icy stream for hours in the hope the weather gods will be kind to you and the light will arrive and hope that while you are taking your long exposure no one walks in your frame.. Then Repeat this 10 times until you have the right shot.

Landscapes are also one of the areas where glass and mega-pixel count make a huge difference to the final image. If you want to be a top landscape photographer you do need that 30-40 MP camera, plus the lenses to do it justice. Interestingly Chris has moved from Nikon to a Sony A7RII, which confirmed my suspicion that whatever Nikon and Canonistsas say, Sony is making big inroads into the top end camera market.

Another interesting snippet was that rather than filters, most of his work is done in camera, or post production. For example, instead of ND filters to smooth water out, he uses in-camera multiple exposures. He says that this is better because it maintains some structure to the water.

Even once you have the photo, the job does not stop there. Landscape photos can be tweaked to death. It is that quest to find the extra 1% to make your photo outstanding. Whether it is bringing out the highlights in the clouds, playing with graduated filters in photoshop, or just putting a white border round your print to emphasis the whites in the photo to judges. Again repeat this  x 1000 because that is how many images you took. All this to get the best out of your shot.

 I realised this sometime ago and decided that landscape photography was not going to be for me, at least for now. I just do not have the time or equipment to do it justice. Nor to be fair do I have the dedication to get up before the dawn on a winter day.

Despite that you can learn a lot from watching the experts go through there work-flow.

From the use of the black and white point sliders (which generally I have ignored) , to the use of other raw processing techniques to get the best out of the initial image, it all goes to making your images that little bit better.

It was also interesting watching him use the Nik collection of plugins.  I have known about these for a while, but Chris showed how best to use them and they make more sense now. The other problem with them was that up to know I had assumed you needed the latest Adobe Photoshop products to use them, but I found out that my photo processing weapon of choice, Zoner photo, supports them as well (but only the 32bit version).

This opens a whole new area of possibilities (and expense), so for that reason alone it was a useful and interesting night.

Friday, 16 October 2015

The glass ceiling

Last night we had this years first club competition on a theme which was chosen about a year ago.

I must admit that I quite like these sort of competitions.Because we are restricted to a narrow subject say compared to landscapes, I find it makes me work and more rewarding harder to find a shot that fills the brief. It also levels the playing field somewhat, so the photography is less about the expense of the gear and more about imagination and fulfilling the shot.

This seasons theme was glass. It is interesting that most of the  club members seem to of thought the same thing when they heard the theme, which was buildings and mirrored glass surfaces. In the end there were a few of those in the competition, ranging from London landscapes to world trade centers.
 However some missed the brief entirely by concentrating on the general city scape rather than the glass itself. The ones that I liked best were those which were almost abstract in their simplicity by playing with the glass surfaces.

There were also a lot of churches and stained glass windows. I must admit I have a problem with photos of art works such as these. The term the judge used last night was 'a good record shot' and that is all they are to me. If you are going to take a picture of say a statue, you have to have something else in context, such as people's reaction to it, otherwise it is not really your work that is being judged, but the original artist.

It was also interesting that a lot of the 'big' guns of the club did relatively poorly last night. That is not because their photos were poor; far from it, but more because instead of creating a photograph that matched the brief, they tried to bend their usual photos to the subject like landscapes (with titles like transparent sea). To me perhaps this shows a lot of specialization.

It was also good to see that one of the winners on the night was taken not on a expensive DSLR, but a camera phone (albeit an expensive camera phone). In this case it was a skylight in a factory taken in a panorama.

This is why themed competitions are so fun. It rewards the imagination over the equipment.

So how did I do?


This got 19....
While this one 16...Why?

This one did well,

But this one was close to winning

Good marks here, but perhaps needed cropping

Probably my biggest fail. Probably cropped too nuch


I must admit when I first heard the competition my thoughts were on initially to take buildings. However it quickly transpired that I would have little opportunity to take such images. I did go to the Victoria and Albert, specifically to take pictures of glass(it has a very good glass staircase), but I failed to get anything useful.

So instead my thoughts turned closer at home with all my images were taken indoors. Not everything worked. My attempts to take glasses and bottles on a mirrored black surface did not really work as well as I would like, and I had a number of failures to take glass against various lit backgrounds. However by staying close to home allowed me to experiment far more than if I had tried to take images on location

I must admit my prints marks were a little disappointing, however he DPI's did really well, with all 3 being kept back for later consideration. In the end, 2 of them got 19 marks and was only a whisker away from winning(again!).

I couldn't complain about the winning entries, both by Simon Pearce , who is pretty good at this sort of thing.

And the next subject is?


By tradition, at the end of the competition a new theme is chosen. This year it was chosen as

Emphasis

which I must admit had all of us scratching our heads and heading for the dictionary. The challenge will be expressing such an abstract term to the judge via photos and i expect an even more diverse set of images next year. I already have come up with some ideas, so 12 more months of work begins now...


Sunday, 11 October 2015

Just a minute....

A lot of people suggest that only in a free society can art truly flourish. While there is no doubt some truth in that, freedom can also be hurdle for trying to create great art.

For example if I asked someone to take a photo of anything, the chances are that the  the huge variety of options would results in an inability to narrow down the available choices to the best shot. It is almost when provided with a free choice, the brain shuts down due to the large number of choices, a bit like a child given free range in a sweet shop.

However if I asked someone to take a picture of say a particular tree, then they could spend ages analyzing the best angle, when the best light would be and different ways of taking the image. By narrowing the options down, it allows you to concentrate on achieving the best possible image.

One such situation is the annual MPS themed competition where you are asked to take images based on a single word. This time it was glass, and I've had a year to try and think of suitable images.

I have to admit not all my ideas proved feasible or even came off as I hoped, but the ones that were meant that I could spend a lot of time trying to get the best possible image.


However yesterday I had an even narrower brief. The website, Kujaja held a project called one minute on Earth. The idea was for photographers around the worldto take a picture at the same time  i.e 10th of October 10:10 a.m and upload them to create a photo book.

I decided to have a go, so I duly went of to my local town, half an hour before the appointed time, to find possible locations.

You quickly realize that this is not as easy as it sounds. First you have to find a spot that is

a) great photographically
b) something to photograph will be there at the specific time.

You also quickly realize that 60 seconds is not a lot of time  to take a photo, and you will only have two or three shots.

In truth it is essential in these sort of situations to have local knowledge since you do not have much time to find possible locations.
 
As it was, I not sure I got the image I wanted, but the strictures put in made me me think a lot about photographing ordinary daily life.

I also learned a lot taking part, namely
  1.  The best places are those with people in static situations such as cafes's. I feel it should be about the story of what people are doing at that particular point in their lives.Landscape and buildings while important change little through the year, so do little to define a period of time.
  2.  Find a spot and setup 10 minutes before. Do not doubt yourself and try and second guess at the last minute. 
  3. Choose the position for photographic reasons as much as who and what is around e.g. The lighting, angles, etc.
  4. Talk to people around you about the project so that they won't be surprised when you whip out your camera at the appointed time.
  5. It would bea  great opportunity to get a group of photographers together to cover different areas and situations. After all you cannot be in two places at once.
One thing I did do right however was my choice of lens. In 60 seconds you cannot faff about changing lens, so what you have at the start is what you are stuck with(unless you are lucky enough to own multiple bodies).

I could of gone with my 50mm prime, but I felt the photo needed the context so I could not frame people two close and the background needed as much as possible be in focus.

I could of gone with my 28 - 210mm, but in the end  I went with 18-24mm to show as much as the surroundings as possible. While there would be some distortion at the wide, I thought that it would meet the brief best. In the end I think that was the right choice.

This sort of exercise is great practice for those high pressure situations where you get one opportunity for a shot (parties, weddings, sports events) and well worth practicing. While initially I wasn't happy with the shots and felt I could have done better, in the end it came out better than I thought.
10th October 10:10 a.m

Update 16/10/2015

I lately realized that I made a mistake with the one minute photo. Unfortunately I had not read the brief carefully enough and now realise they were looking for outdoor shots that showed the state of the sky and weather around the globe. If I had realised this at the time I would probably take another shot. As it was I am not the only one to get this wrong, and to be honest I prefer my approach. Landscapes are nice, but peoples life's are the greater quantum and I think it is more important to record. As it is, I can probably justify it due to the windows in shot, however there is a lesson to more carefully read the brief in these situation.


Friday, 9 October 2015

The way I see it - Gerry Coles

We had an excellent talk last night at the MPS from Gerry Coles.

What impressed me most was that he got very high quality results from quite simple photographic and photoshop techniques. He also gave the great advice that the best way to improve in photography is just to try things and the need to make your photos stand out by adding something different. At the same time ignore what the judges say and follow your instinct.

It was interesting that a lot of his techniques were derived from his film and developing days. It makes me wonder that when we reach the point when there are no more people who have come from that route whether we will lose some of that useful experience.

It is always instructive to watch someone comfortable with themselves show their creative process, and while I am sure that it is harder than it looks, it gave me a lot of inspiration to try some similar techniques.

My only real critic is that some of his photos crossed the line between photography and graphic art, but that is another argument for another day....

All in all however an excellent night.


Tuesday, 22 September 2015

Here we go again....!


The Melbourne art festival theme this year was "out of the woods"


This is the first year where I have gone through a full circle of a photographic season consisting of a full  photography club  program followed by a pause over the summer months.

This is the standard calendar for the club, but before I had gone through it, I had not understood the reasoning behind it. I now see that it is to allow the organization of trips to be be undertaken while the days are long.

Unfortunately due to my work, it is rare that I can take advantage of these opportunities. Therefore during these months there is a tendency to lose touch with the majority of the club membership.

The month of September is where it all kicks off again, starting with an exhibition of members work as part of the Melbourne arts festival. This is also a great opportunity to compare and contrast your work over the summer with some of the other members.

The Club presentation. None of my photos are in this picture(they are just too good!!)
As always, I arrive with high hopes, but this lasts up to my first viewing of other work.  There are some great photos this year with more to come. I therefore get a sinking feeling when I do a comparison between my efforts and the others.

However I thought the same last last year and was proved to be wrong (some of the time anyway), so it is probably just natural pessimism. However time will tell, whether it also includes any semblence of realism.

I learned from last year was to never 2nd guess photographic judges. All you can do is your best and hope on the day of competition  that your vision matches a particular judges mindset.

Exhibitions


One thing I am always in a quandary about, is whether I should show my competition photos in these sort of shows or whether I should I keep my powder dry, so to speak.

In reality, I probably think too much about these sort of things, but part of me feels I should not forewarn the competition (as I like to call my fellow members). Part of me also feels that I should give myself a good slapping and just get on with it. Unfortunately these sort of ideas often struggle up from my primeval sub-conscience, where in reality they should be well and truly sat on.

In the end, I did not present what I considered my best photos and this back fired. For the 1st time, the club decided to have a public vote on the print images in the exhibition. This was a last minute decision, but I think that if I had known before hand I would of chosen and presented different images. In the end karma gave me a good kicking.

The Public Vote

Watching what the public like can be very instructive.

I have noticed in the past that the photos that non-photographers like, are not necessarily what do well in competitions and vice versa.

Generally the public like photographs with bright colour's, while black and white photos are considered more kindly by judges. Also the subject can be as important as the photo technique. Wildlife is always a winner and it is was of no surprise that two pictures of Puffins (by Simon Pearce and John Wesson) were doing well.

Another photo that was doing well on the day was a picture of a train. This had fared badly ( harshly in my opinion) during competition, so it just goes to show the contrast between public and judges opinions (and maybe judges don't it always get it right).

One of the things I noticed about my work when reviewing this summers photos was that I had taken an lot of black and white photos this year( partly due to my experimentation with infra read). I was tempted for a while to present all black and white photos in the exhibition, but I chickened out. In the end it was however the right decision, but for the wrong reasons.

Another thing I noticed was that club members tend to show larger prints in these occasions than the competition rules allow. This again means the photos have more impact in these sort of public exhibitions.

Due to its success I am sure that the public vote will become a integral part of exhibitions from now on, so next time I will take this into account.

Round the festival


Because the exhibition was part of a larger arts festival, it also gave me a chance to look at some other 'professional' photographers. While there were some great work out there, there were also some which I could not understand at any level.

One in particular was photos of textures such as brick walls and other such things. I like to think I have a broad view of photography, but I struggle to see such things attractions or why anyone would buy them.

Obviously they make money from such images, so it must be me. Again however it shows that photography as with any art, quality comes down as much to personal opinion as any other metric

The organizers also asked if the club would take photos of the festival (This is a bit like asking a crack addict, if they would mind getting free cocaine). I duly took the opportunity to try my hand at event photography, yet again. My initial review of results were disappointing, but now I processed them, I am happy with some of them.

I have said before that it is not an area of photography I ever feel comfortable doing, but maybe it is an area I should do more often. However it will be interesting to see what other members get.

We're forever blowing bubbles!


Friday, 18 September 2015

Seeing things in a different light


A few months ago I chronicled my conversion of an old bridge camera that I had lying around into a infra-red play thing.

Since then it has been a trusty companion over the last few months and I thought it would be a good time to document what I have learned in using it.

The first thing to state, is despite is lowly specifications (7MP)  I can truly say that I have had more fun with with this little hacked cameras than with my more expensive and larger DSLR kit over the summer months.

There are a number of reasons for this,including it's novelty and learning about new photography techniques, but a large part is down to the cameras lightness.

Despite my main camera being a comparativelysmall DSLR. I have come to appreciate a camera that does not weigh you down. In fact, so much so, that I have started to re-think my next camera choices.

I had been tempted bya Sony A-77 Mk II (on the basis that it now seems likely that their will never be another A -Series DSLR). However while now doubts a fine camera, it is comparison with my present kit, a heavy and large beast. So now I ma considering a Sony A-6000 (presuming there is no new consumer E-Format camera in the next few months ). I have even begin to think the unthinkable about other small mirror less cameras such as the  Olympus OM-D E-M10 or the Fujifilm X-T10.

However that is all for the future. What I want to say now is what I found after playing around with IR photography for a few months.

The Best Subjects


Like I said, I have been taking a lot of IR photos over the last few months and I feel I am starting to get an idea about the best ways to take IR photos.

So what have I found in the last few months.

The Good


Trees.

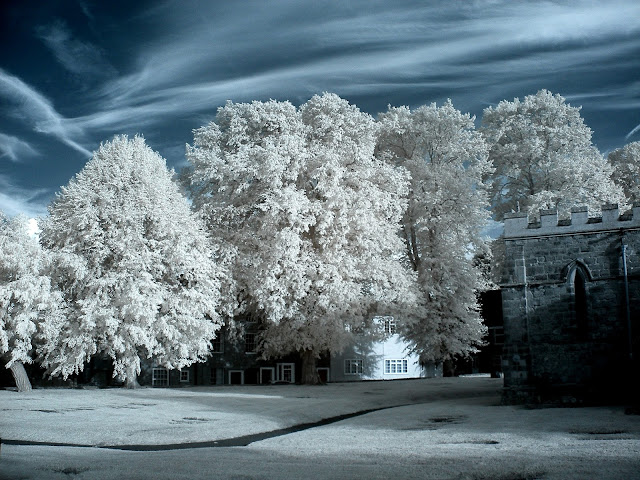
Trees just look fantastic in IR, particularly when in full foliage. In fact I am in danger of starting to build a collection consisting of just standalone trees. Now I cannot resist taking pictures of lone trees against a sky background in IR.

They look especially good with a 850mm filter on. This is because foliage is such a great IR reflector that you get great definition without the green from the leaves overwhelming the picture (eyes are very sensitive to green so can obscure other details)


Clouds

One of the great advantages of IR photography is that IR light is not absorbed by water vapour as much as visible wavelengths are.

This means otherwise hazy skies have much greater contrast and definition in IR light. Take an IR picture on what otherwise appears to be an overcast day, and it results (to my eyes anyway) in pictures of stunning skies, with great cloud definition. I find IR works particularly well when the sky is partially cloudy, but not great on totally overcast days


Landscapes

Since IR photography takes such great pictures of trees and skies, it should be no surprise that landscapes look great too. Because grass is a great IR reflector too, landscapes get an almost fairyland appearance, like they are winter snowy scenes (but without the need to endure sub-zero temperatures to obtain them)


Buildings

Buildings, especially when in full sunlight come out with high contrast, which really suits architectural photography. I'm a great fan of Joel Tjintjelaar  and Julia Anna Gospodarou work in taking high contrast black and white pictures of buildings and cities and I wonder whether there is a role of  IR in this form of photography


Bare Metal

Anything with bare  metal such as old cars, motorbikes and vintage aircraft all look really good in IR. (Trivia point. David Lean's much underrated film the breaking the sound barrier used IR film for many of the flying sequences).

One of my issues with the camera is that it istoo slow to capture such images apart from when they are static.


The bad.


So IR cameras can take some great images, but there are downsides

Low Light

Some think that IR photography allows you to take pictures in the dark. However this sort of camera is just not sensitive enough for that sort of photography.

In fact with the filter basically cutting out over a third of the available light, it is actually far less sensitive than a normal camera before the conversion.

The camera I converted is a product of its age and was not greatly sensitive to begin with. In fact one of the things that has improved greatly with modern cameras is how far you can push their sensitivity before noise starts becoming a problem. However with this camera, anything oner ISO 200 risks too much noise. So generally the camera only works well with a wide aperture in good light

Noise

The corollary of low light performance is image noise. In truth all IR photography will suffer from noise due to the fact we are using just one channel of our sensor(link?). This means the sky especially can show a lot of salt and pepper noise. Now this can be removed with a good photo package, but with the risk of a subsequent loss in sharpness. Saying that, some people actually like the noise and it can add to a picture in some situations.

Photos into the sun.

With IR you have to be very careful in where you are in relation to the sun.

Generally any picture taken up to 45 degrees from the sun will result in flares in the photo. Again these can sometimes add to a picture, but it is a hit and miss affair and generally should be avoided. One thing I need to try,  is to see if fitting a sun hood will help in this.

However generally it is a good idea to try and take the pictures with the sun behind you as much as possible.

Like Icarus, too close to the sun. Not ruined though

The Ugly

People.

Not all subjects come out well in IR photography.

While people give off IR, the camera is just not sensitive enough to distinguish features well. People come out bland, washed out and pretty weird in IR, so IR portraits are probably not a good idea.

However that doesn't mean you should never take photos of people, but you need to be aware of it's limitations (It have some interesting ideas how I can use the effect as we move into Halloween)

Other thoughts


Filters

So far I have bought only two filters to put on the front of the camera, a 720nm and 850nm filter. The difference being is that a 720nm crosses the cusp between visible and IR light, meaning as well as getting more light through, we also get some color.

The 850nm lets virtually no visible light through at all, but you do get a "purer" infra red image.

Of course there is nothing stopping you converting a photo using the 720nm into black and white later, but I must admit I like the 850nm more and have probably spent a lot more time with it.

I have found myself using the 850nm filter far more than the 720nm just because I like the effects.


Processing

The advantage of the 720nm filter is that it can be processed to give blue skies. This a bit of a trick caused by the fact that red in the sky leaks through with this filter on.  To get a blue sky from the red, what is required is to swap the red and blue channels. While the effect can be effective, to me it can appear a little faked. Also it actually results vary widely and I need to experiment to see what are the best ways to achieve this effect.

With a 850nm filter, the image benefits from compressing the limits a little bit. In  fact I find the most effective IR photos are those where the limits can be easily compressed without losing the signal.,

Apart from that, some noise reduction can benefit some photos, especially if the sky is very noisy.


720nm picture before swapping the channels
After processing

Going forward

Like I said, I have had some great fun with the camera despite its lowly specifications. However as with all cameras, the more you use it, the more you are aware of its limitations.

Firstly, although I have not had too many problems with resolution due to the 7MP sensor , a few more MP would be useful, especially if I have to crop the image.

The biggest issue however is pour ISO  noise. Because it is a camera of it's age, I don't really like pushing the ISO too much, because it quickly becomes noisy. This limits to only using the camera in good light and full aperture. It also means that the shutter speed is quite slow.

Therefore I am already thinking about doing a conversion on another Camera. While I would love to see what a Sony A7S II would do as a IR camera, I may have to set my sites a little lower. (I did see someone had done a conversion on a A7R. I have mixed emotions on this. My 1st is jealousy, my 2nd is amazement that anyone has a £1600 'spare' camera)

A tempting target is a Sony NEX-3, which are only about £100 on ebay. One downside is that it does not have a viewfinder, but in every other respect looks perfect.

Until then I still want to try some other things out, such as playing more with the 720nm filter, maybe trying some other filters and seeing what IR cameras do as we move into Autumn and Winter and seeing what happens with flashes.

Playing with IR has been a great experience to me and opened a whole new world of opportunities. You could say that I have seen my photography through a totally new light :)

Useful Links


Wednesday, 19 August 2015

Smash and Grab

 This is an update on the fun I have smashing glass. I blogged here about my attempts to photograph light bulbs being destroyed.

Since then I have refined my techniques a little.

The diagram below is the basic setup


 Basically it is a swinging arm, with a hammer attached, directed towards a unsuspecting light bulb. The camera is opened before the swing and at the opportune moment the flash fires taking the image.

When we left it last time I was having problems attaching the hammer, keeping the bulb still on impact and getting only one flash.

These problems have largely been solved. The hammer is now attached using a couple of metal strips with bolts through them. I added extra bracing behind the bulb to stop it going back on impact.

The multiple flash took a bit of working out. The problem was the hinge which formed 1 part of the switch did not move out the way enough when hit by the bolt, This caused the bolt to scrape against the hinge edge, so causing the multiple flash. This was solved by making the bolt hit the center of the hinge, and putting insulating tape on the edge.

I also put black cloth at the end of the garage so we have a cleaner backdrop.

The original intention was to fine tune the contact point by moving the bolt in and out. However it worked out easier to move the work bench.

Below is the setup in all it's glory. Note the pristine work conditions.

The way it works is that I hold the pendulum to one side, activate the camera in bulb mode using a remote trigger. Let go of the arm and hopefully once the flash has gone, let go of the camera remote. It is then a process of picking through the broken glass in order to setup the next shot.

Here is a closeup of the trigger. I was tempted to build a electronic delay  trigger and certainly a sound triggered system may of been easier, but the low tech approach worked too.


So what are the results? Certainly getting there. One thing I learned was the duration of the flash is based on the power. The lower the power the shorter the flash. So I have moved the flash closer and set the camera ISO higher

As I mentioned before, my original intention was to break bottles, but they proved rather resilient for that. Because of size constraints I am limited to the maximum swing of the pendulum. Still now I have perfected the technique I may give it another  go at some time.